Getting Started - VSCode
This guide provides instructions on how to setup VSCode for C++ development work on the Karabo Framework or on a Karabo C++ Device. The setup instructions in here are for Ubuntu versions 18 and 20 - they should work with few modifications for other Linux distributions supported by Karabo.
1. Installation Steps
1.1. Install VSCode
To install VSCode, please follow the instructions at https://code.visualstudio.com/docs/setup/linux.
For Ubuntu, both the snap and the apt based installation methods work.
1.2. Install VSCode C/C++ Extensions
Open VSCode, and install the following extension pack:
- C/C++ Extension Pack - https://marketplace.visualstudio.com/items?itemName=ms-vscode.cpptools-extension-pack
1.3. Configure GDB Pretty printing
This step may not be needed on your system. Please test your VSCode with a simple C++ program that has a std::string, a std::vector or any other standard container and see if instances of those types are properly presented in the debug view. In particular, on a Ubuntu 20 test system no extra configuration was needed to have gdb pretty-printing working.
Without pretty-printing, some C++ Standard Library like std::string and std::vector are not printed properly in the debugging view of VSCode (the string and vector highlighted by the yellow rectangles in the image below):
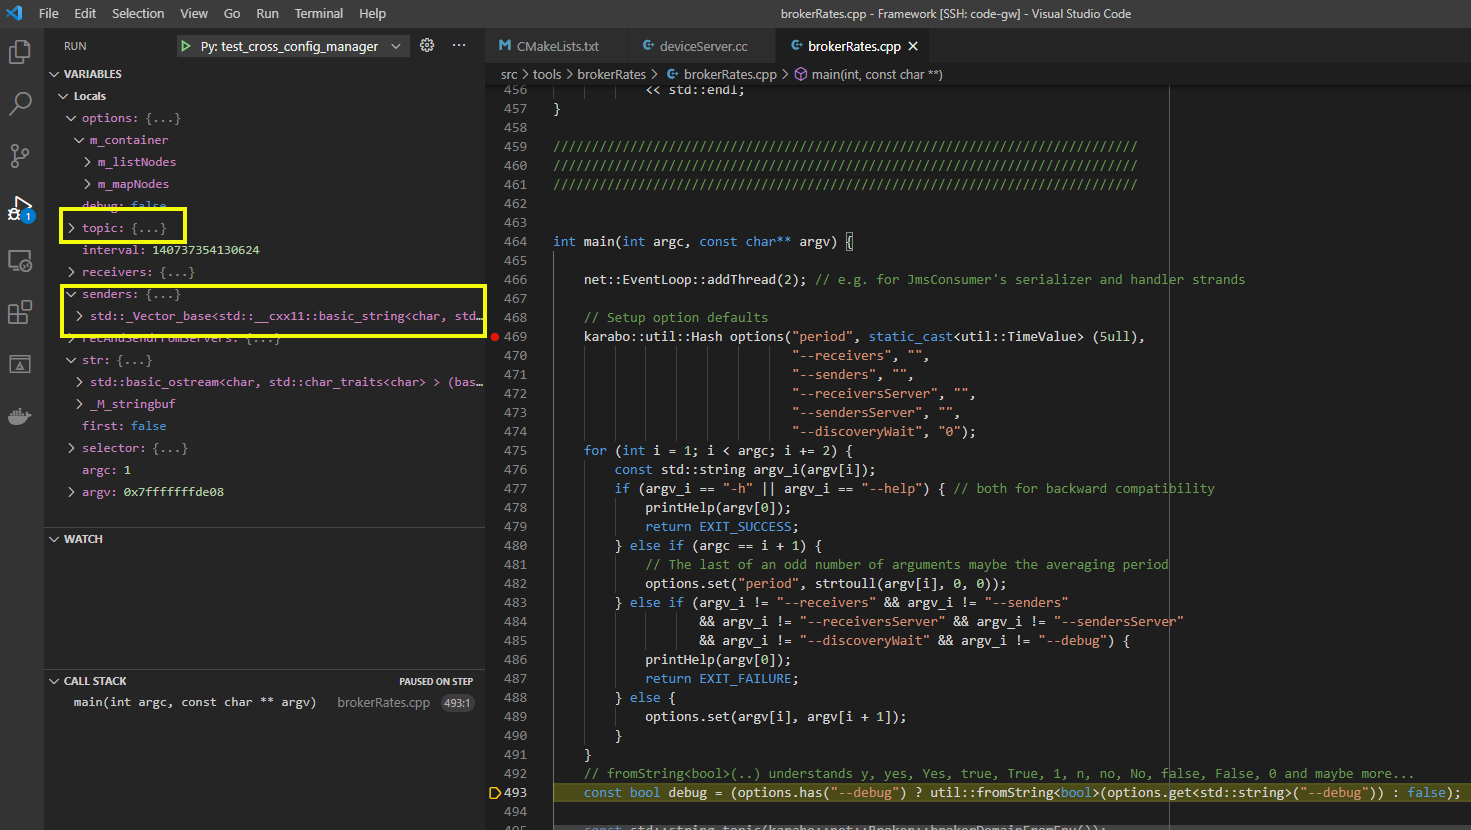
To enable gdb pretty-printing, please create the file ~/.gdbinit with the following contents:
python
import sys
sys.path.insert(0, '/usr/share/gcc-[YOUR_GCC_MAJOR_VERSION]/python')
from libstdcxx.v[YOUR_STDLIBCPP_MAJOR_VERSION].printers import register_libstdcxx_printers
register_libstdcxx_printers (None)
end
Replace [YOUR_GCC_MAJOR_VERSION] with the major version number of your gcc installation, e.g. 7, and [YOUR_STDLIBCPP_MAJOR_VERSION] with the major version number of you stdlibc++ library, e.g. 6.
For reference, this is an example of a working ~/.gdbinit for Ubuntu 20 with gcc 9.3.0 and gdb 9.2 installed:
python
import sys
sys.path.insert(0, '/usr/share/gcc-10/python')
from libstdcxx.v6.printers import register_libstdcxx_printers
register_libstdcxx_printers (None)
end
Once gdb pretty-printing is configured, you should see std::string and other C++ Standard Library types properly displayed in the VSCode debugging view (the string and vector highlighted by the yellow rectangles in the image below).
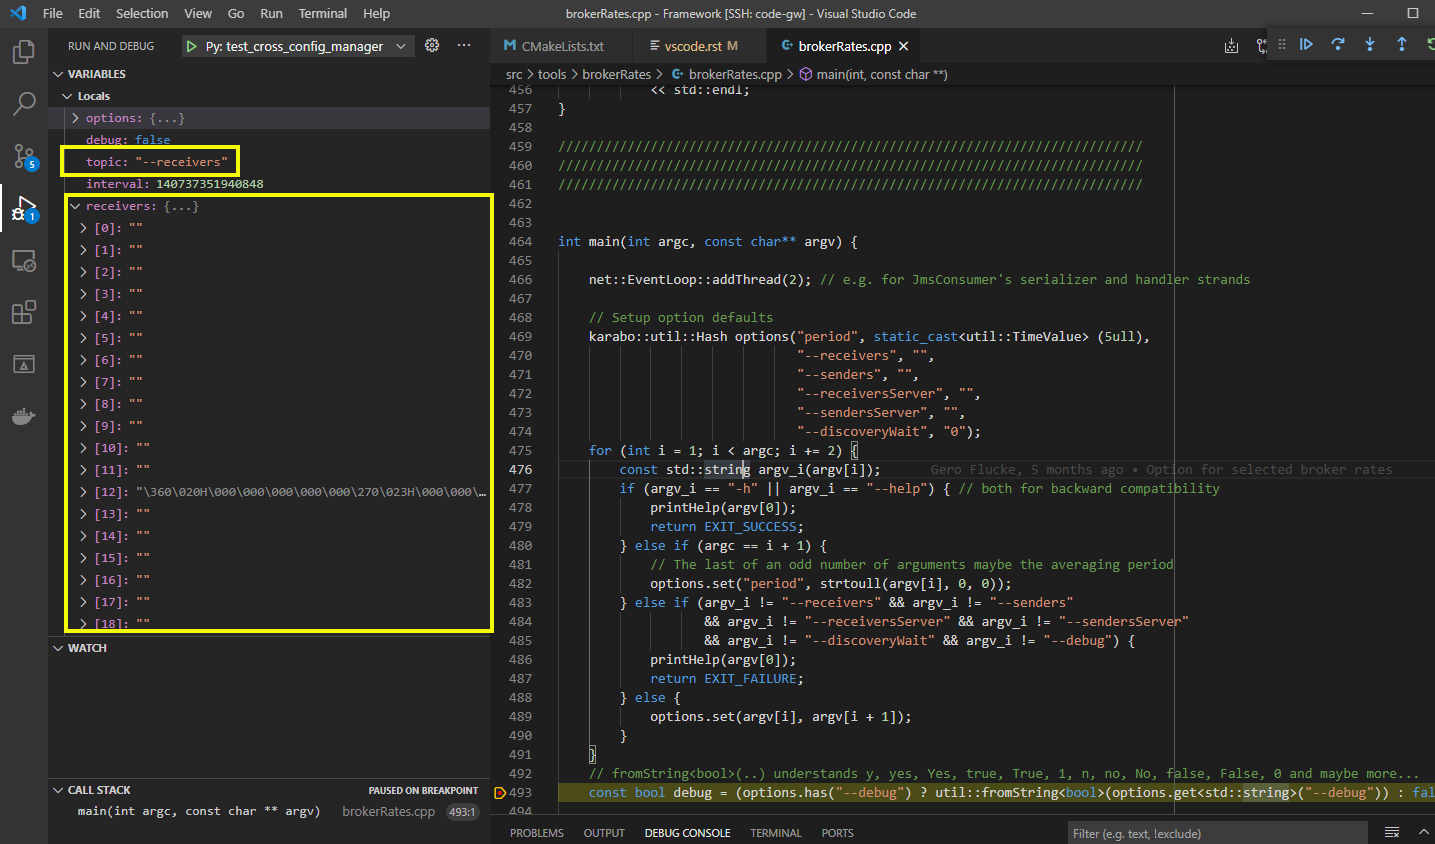
1.4. Clone the Karabo Framework repository
Clone the Karabo Framework git repository into your local system with:
git clone ssh://git@git.xfel.eu:10022/Karabo/Framework.git
or with:
git clone https://git.xfel.eu/Karabo/Framework.git
depending on the access mode you have configured for the remote Karabo git repository.
1.5. Configure the VSCode for the Karabo Framework Workspace
To setup VSCode with the appropriate CMake related options for building the Karabo Framework, go to the directory where you cloned the Karabo Framework in the previous step and from there run the script build/karabo/setupVSCodeCMake.py. The script will create (or update) the file .vscode/settings.json used by VSCode as the settings for the workspace for the Karabo Framework project. The script is pretty safe: it backs-up any existing version of the settings.json file and it only sets the entries related to CMake. An example of the settings updated (or added) by the script is given:
"cmake.sourceDirectory": "/home/bob/work/Framework/src",
"cmake.buildDirectory": "/home/bob/work/Framework/build_debug",
"cmake.cmakePath": "/home/bob/work/Framework/extern/Ubuntu-20-x86_64/bin/cmake",
"cmake.configureSettings": {
    "CMAKE_BUILD_TYPE": "Debug",
    "CMAKE_INSTALL_PREFIX": "/home/bob/work/Framework/package/Debug/Ubuntu/20/x86_64/karabo",
    "CMAKE_PREFIX_PATH": "/home/bob/work/Framework/extern/Ubuntu-20-x86_64",
    "BUILD_UNIT_TESTING": "1",
    "BUILD_INTEGRATION_TESTING": "0",
    "BUILD_LONG_RUN_TESTING": "0",
    "GEN_CODE_COVERAGE": "0"
}
The cmake.sourceDirectory informs the VSCode CMake extension about the location of the root CMakeLists.txt file. If this parameter is not specified, VSCode will complain about not finding a CMakeLists.txt file in the root of the workspace and will prompt you to manually choose the main CMakeLists.txt among all the CMakeLists.txt files it finds in the workspace.
As the Gitlab CI of the Karabo Framework project checks the formatting of the C++ source files for compliance with a standard style, it is recommended to also setup the options related to automatic formatting by VSCode. The standard style checked against is defined by the configurations in the .clang-format file at the root of the Karabo Framework repository. A recommended configuration is shown by the excerpt of the .vscode/settings.json file shown below:
"editor.defaultFormatter": null,
"editor.formatOnPaste": true,
"editor.formatOnSave": true,
"editor.formatOnSaveMode": "file",
"C_Cpp.formatting": "clangFormat",
The VSCode C++ Extension installed in step 1.2 contains a recent version of the clang-format tool, so no installation is needed. If for some reason you prefer to use another instance of the clang-format tool, please be informed that the Gitlab CI uses version 17.0.6 of clang-format. Formatting with any version older than that may result in the CI formatting test not passing.
Before opening the Karabo Framework CMake project inside VSCode, the auto_build_all.sh script must have been executed successfully at least once with either the Debug, Release or CodeCoverage options. auto_build_all.sh will take care of either downloading or building the external dependencies of the Karabo Framework and make them available to the CMake project.
Similarly, as auto_build_all.sh Clean-All clears all the external dependencies, after its execution an auto_build_all.sh with either the Debug, Release or CodeCoverage options must be completed successfully before the CMake project can be opened and work properly again in VSCode.
Now open the local Karabo Framework repository working folder in VSCode by issuing the following commands:
cd [KARABO_FRAMEWORK_DIR]
code .
VSCode should find the CMakeLists.txt file in the src folder of the Karabo Framework working folder and ask you if you want to configure the CMake project. Just say yes. Once the CMake project has been configured, you should see the following contents in the CMake Project Outline view of VSCode:
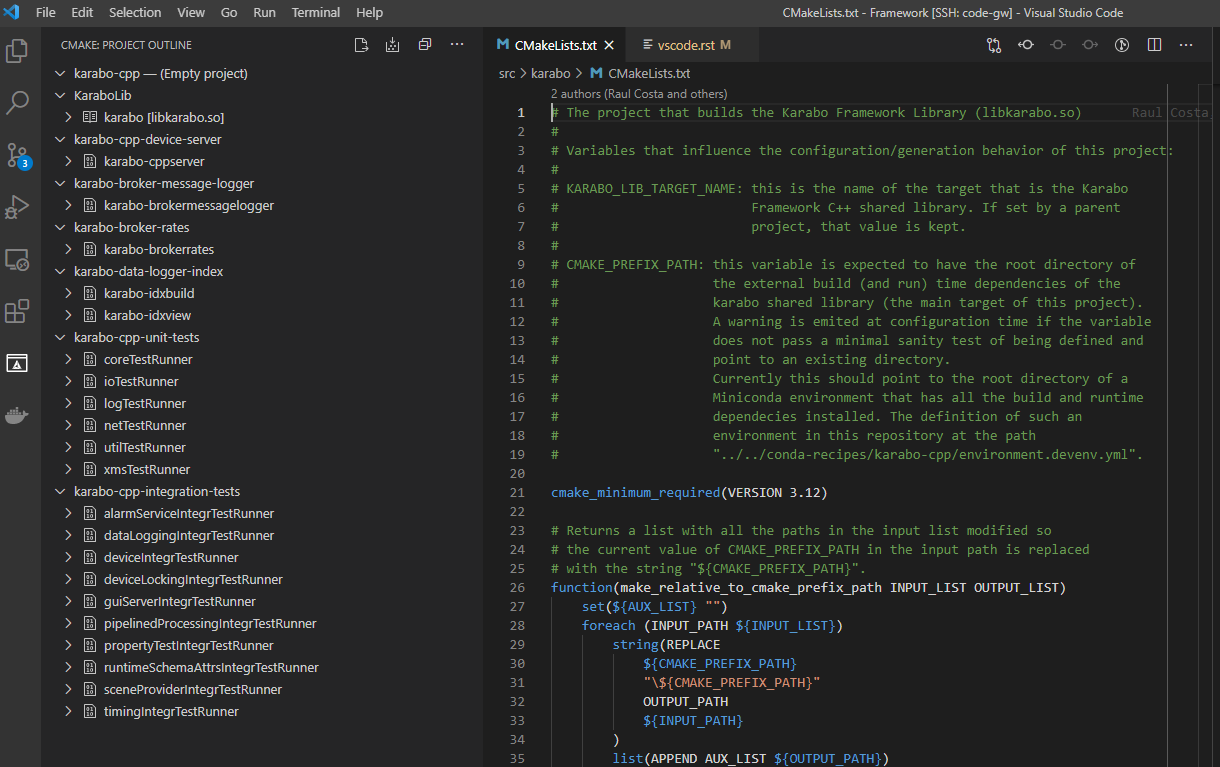
2. Using your VSCode Environment
2.1. Build the Karabo Framework
To build the whole Karabo C++ Framework, please select the Build All Projects in the CMake Project Outline view (highlighted in yellow in the image below).
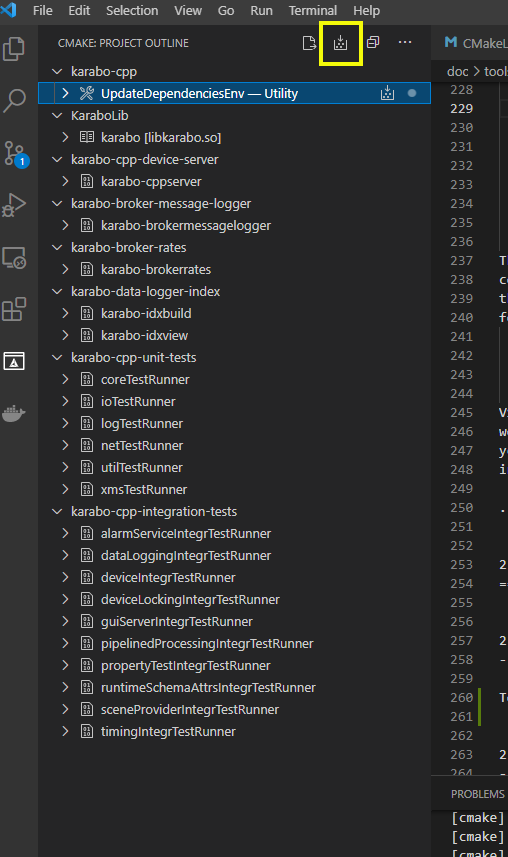
If your CMake Project Outline view happens to empty, press the Configure All Projects button that is to the left of the Build All Projects button, in the same toolbar. That should execute the configure and generate phases of the Karabo’s Framework CMake project, and populate the previously empty view.
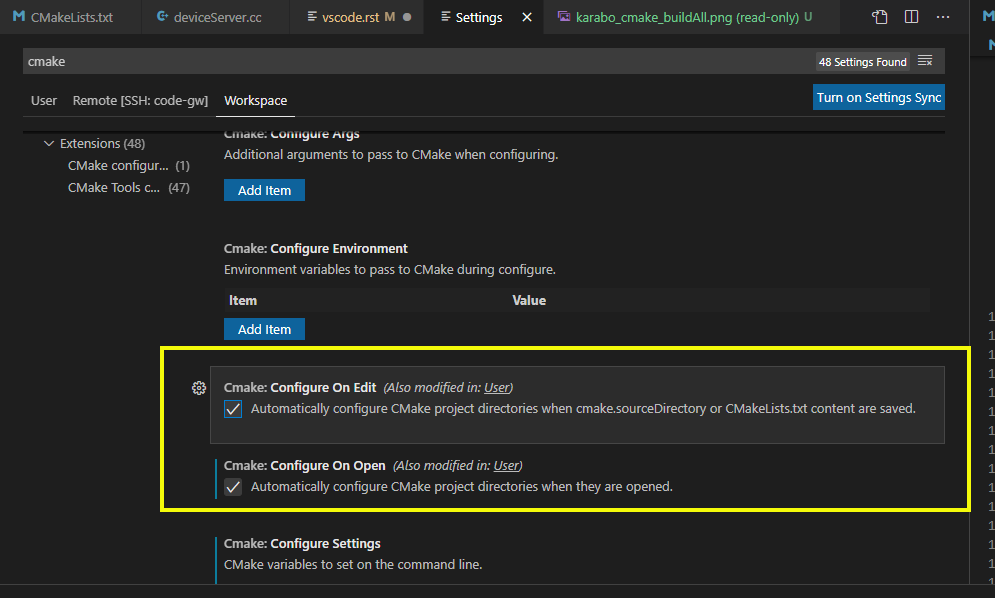
If you don’t want to press Configure All Projects in order to have the CMake project outline updated, please open your Workspace preferences and check that the Cmake: Configure on Edit and Cmake: Configure on Open options are enabled (highlighted in yellow in the image below):
2.2. Run and Debug the Framework Tests
To run one of the Framework unit or integration tests, right-click on its project node in the CMake Project Outline view - one of the *Runner nodes under karabo-cpp-unit-tests or karabo-cpp-intergration-tests in the first image of section 2.1. The context menu will have options to Build, Debug, and Run the corresponding test.
If you prefer to run more than one test at once, please open a terminal, either internal or external to VSCode, go to your build directory and issue a ctest command. In the example below, all tests are run in the default non verbose mode:
cd ../../build_debug_karaboCpp
ctest
It is also possible to run all tests whose names match a given regular expression in either verbose mode (-V option) or extra verbose mode (-VV). In the example below, dataLoggingIntegrTestRunner is the only test run, and in extra verbose mode:
ctest -VV -R "dataLogging*"
Verbose and extra verbose modes cause ctest to output, among other things, one line per successful test case execution. The default verbosity level only emits intermediate reports for failed test cases - the number of successful test cases executed, without their names, is reported at the end of the test execution while in default verbosity level.
To list all the tests that are available for ctest to execute:
ctest -N
ctest also supports a -E option which is the complement of the -R option, meaning execute all tests that do not match the given regular expression.
Some tests, especially some of the integration tests, require a KARABO environment properly set. As the CMake build tree is not a full-blown Karabo installation, you will need to source the activateKarabo.sh script before running your test. That script is generated by the CMake build and is tailored to your build tree. There are two ways of establishing a proper KARABO environment in order to run tests and utilities, e.g. karabo-brokermessagelogger, from the build tree:
Launch VSCode from a shell where source [BULD_TREE_PATH]/activateKarabo.sh has already been executed, or,
From the internal VSCode terminal session, execute the command source [BUILD_TREE_PATH]/activateKarabo.sh. Please be sure that you’re issuing the command from the right internal terminal session - the one with CMake/Launch title in the terminal toolbar (picture below).
