Getting Started - VSCode
This guide provides instructions on how to setup VSCode for C++ development work on the Karabo Framework or on a Karabo C++ Device. The setup instructions in here are for Ubuntu versions 18 and 20 - they should work with few modifications for other Linux distributions supported by Karabo.
1. Installation Steps
1.1. Install VSCode
To install VSCode, please follow the instructions at https://code.visualstudio.com/docs/setup/linux.
For Ubuntu, both the snap and the apt based installation methods work.
1.2. Install VSCode Extensions
Open VSCode, and install the following extensions:
- C/C++ from Microsoft - https://marketplace.visualstudio.com/items?itemName=ms-vscode.cpptools.
- CMake Tools from Microsoft - https://marketplace.visualstudio.com/items?itemName=ms-vscode.cmake-tools.
The following additional extensions are not required, just recommended:
1.3. Configure GDB Pretty printing
This step may not be needed on your system. Please test your VSCode with a simple C++ program that has a std::string, a std::vector or any other standard container and see if instances of those types are properly presented in the debug view. In particular, on a Ubuntu 20 test system no extra configuration was needed to have gdb pretty-printing working.
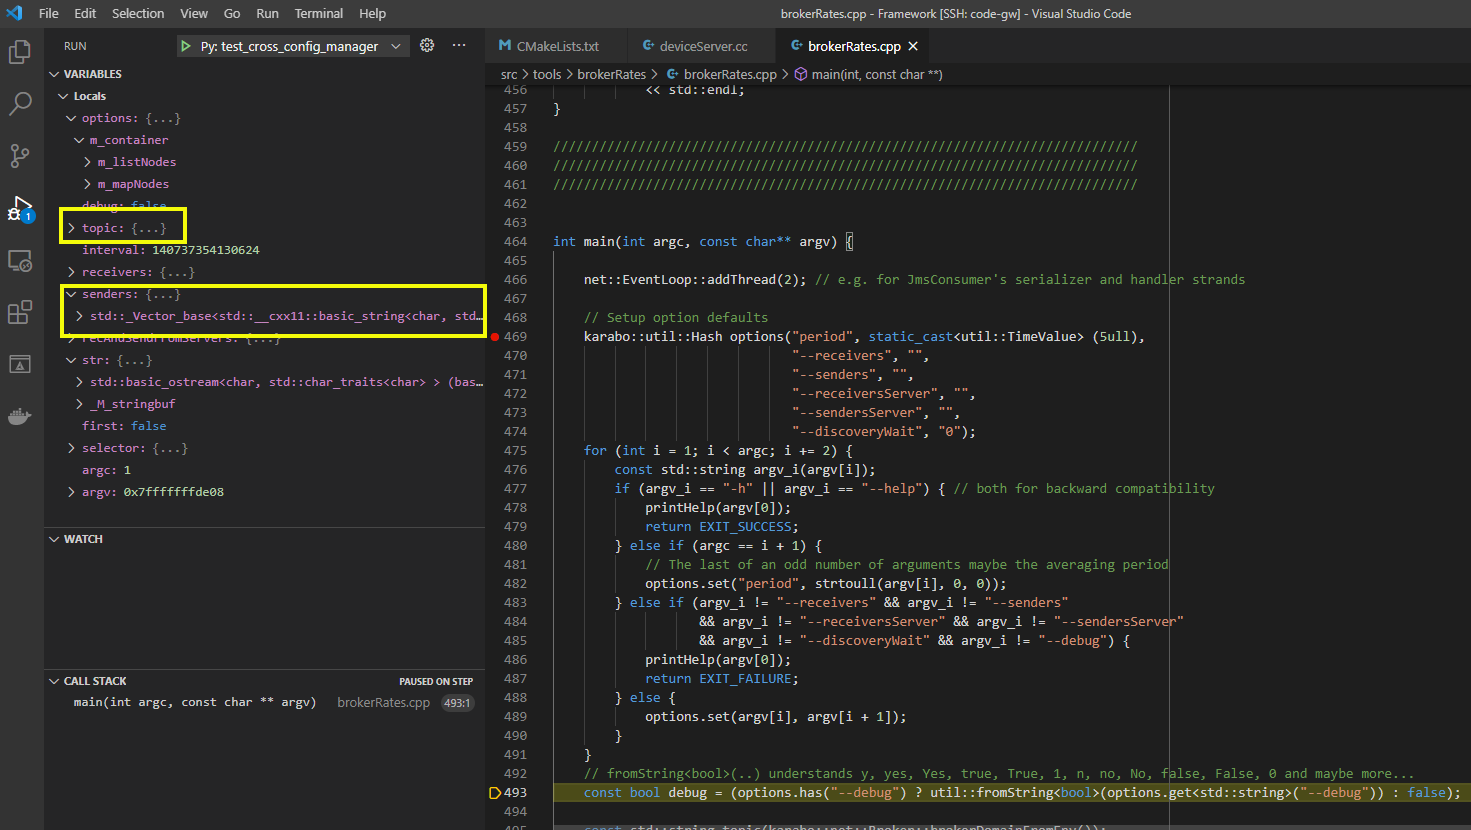
Without pretty-printing, some C++ Standard Library like std::string and std::vector are not printed properly in the debugging view of VSCode (the string and vector highlighted by the yellow rectangles in the image below):
To enable gdb pretty-printing, please create the file ~/.gdbinit with the following contents:
python
import sys
sys.path.insert(0, '/usr/share/gcc-[YOUR_GCC_MAJOR_VERSION]/python')
from libstdcxx.v[YOUR_STDLIBCPP_MAJOR_VERSION].printers import register_libstdcxx_printers
register_libstdcxx_printers (None)
end
Replace [YOUR_GCC_MAJOR_VERSION] with the major version number of your gcc installation, e.g. 7, and [YOUR_STDLIBCPP_MAJOR_VERSION] with the major version number of you stdlibc++ library, e.g. 6.
For reference, this is an example of a working ~/.gdbinit for Ubuntu 20 with gcc 9.3.0 and gdb 9.2 installed:
python
import sys
sys.path.insert(0, '/usr/share/gcc-10/python')
from libstdcxx.v6.printers import register_libstdcxx_printers
register_libstdcxx_printers (None)
end
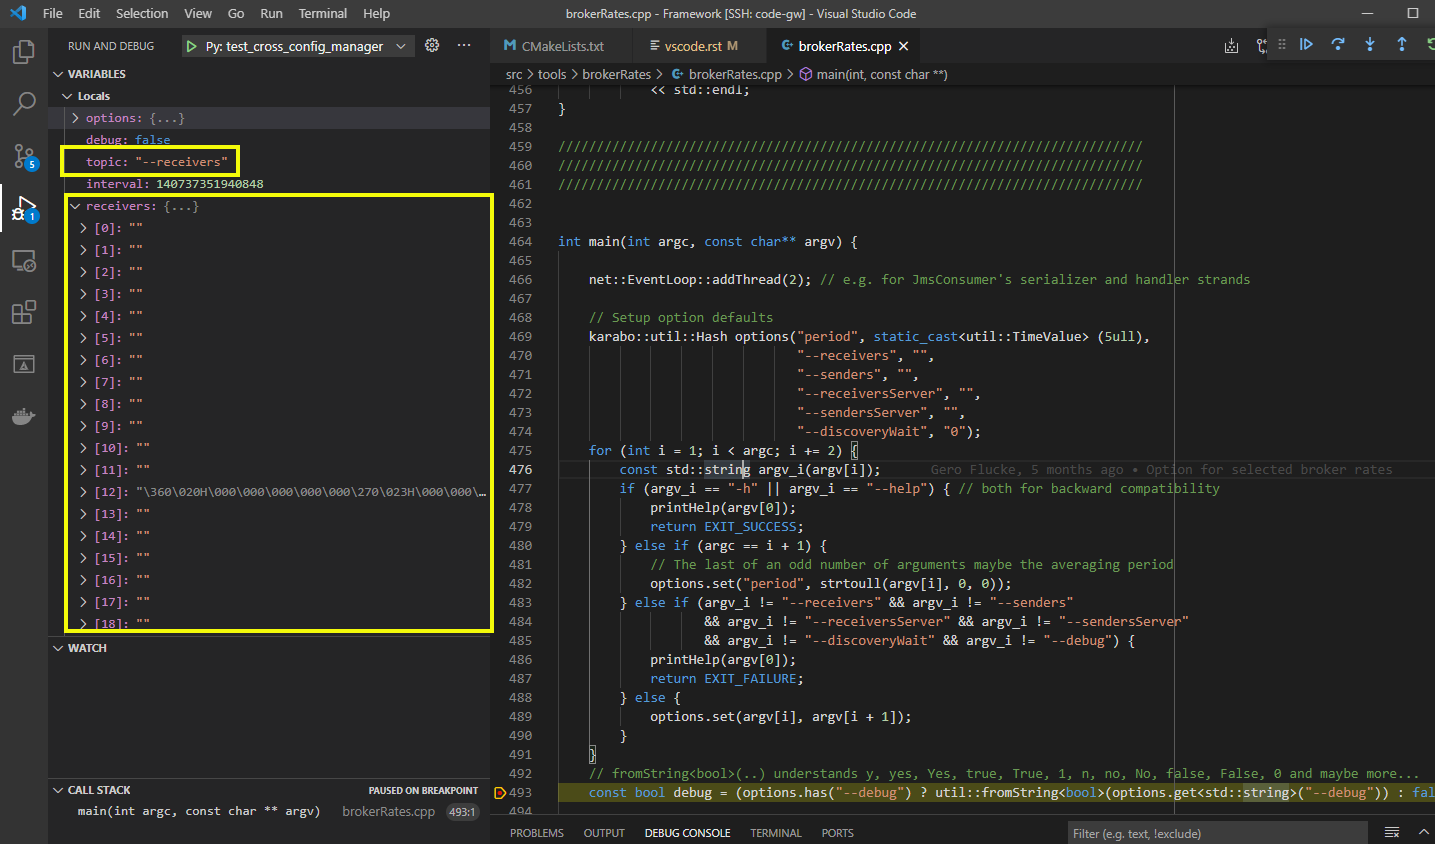
Once gdb pretty-printing is configured, you should see std::string and other C++ Standard Library types properly displayed in the VSCode debugging view (the string and vector highlighted by the yellow rectangles in the image below).
1.4. Clone the Karabo Framework repository
Clone the Karabo Framework git repository into your local system with:
git clone ssh://git@git.xfel.eu:10022/Karabo/Framework.git
or with:
git clone https://git.xfel.eu/gitlab/Karabo/Framework.git
depending on the access mode you have configured for the remote Karabo git repository.
1.5. Install Miniconda
The cmake build of the Karabo Framework library requires all the build dependencies to be available on the building system. A good and less invasive approach to guarantee that is to create a Conda environment with those dependencies installed.
Due to its smaller size, Miniconda is recommended over Anaconda. If you already have Anaconda installed, everything should work fine as well.
To install Miniconda, please follow the instructions at https://docs.conda.io/projects/conda/en/latest/user-guide/install/linux.html.
1.6. Create the Conda Environment with the Karabo Framework dependencies
Once Conda is installed, an XFEL hosted Conda channel will be needed to get some of the Karabo Framework dependencies. To add those channels, run:
conda config --add channels http://exflserv05.desy.de/karabo/channel
If you are outside the DESY network, an SSH tunnel will be needed as the host exflserv05.desy.de is not public. A detailed explanation on how to add the channels when outside the DESY network can be seem at https://in.xfel.eu/readthedocs/docs/karabo/en/latest/installation/gui.html#remote-installations.
While validating the installation tests on a test machine, it happened that the Miniconda installation lacked the conda-forge channel. As this channel is required for some of the Karabo Framework dependencies, please make sure that conda-forge is listed as an output for the following command:
conda config --show channels
If conda-forge is not listed, please run the following command and list the channels again to make sure it has been properly added:
conda config --add channels https://conda.anaconda.org/conda-forge
The next step is to create a Conda environment with the packages corresponding to the Karabo Framework dependencies installed. For that the conda-devenv package is needed:
conda install conda-devenv -c conda-forge
conda devenv -f [KARABO_FRAMEWORK_DIR]/conda-recipes/karabo-cpp/environment.devenv.yml
Replace [KARABO_FRAMEWORK_DIR] with the path of the directory where you cloned the Framework repository to in step 1.4.
1.7. Configure the VSCode for the Karabo Framework Workspace
Go to the directory where you cloned the Karabo Framework in the previous step and create a .vscode sub-directory in there - do not worry, .vscode is already included in the repository’s .gitignore file. In the .vscode directory, create a settings.json file with the following content:
{
   "cmake.buildDirectory": "${workspaceFolder}/../[BUILD_DIR]",
   "cmake.sourceDirectory": "${workspaceFolder}/src",
   "cmake.configureSettings": {
      "CMAKE_PREFIX_PATH": "[CONDA_ENV_DIR]",
      "CMAKE_INSTALL_PREFIX": "[KARABO_FRAMEWORK_INSTALL_DIR]",
      "CMAKE_BUILD_TYPE": "Debug",
      "BUILD_UNIT_TESTING": 1,
      "BUILD_INTEGRATION_TESTING": 1,
   }
   "editor.defaultFormatter": null,
   "editor.formatOnPaste": true,
   "editor.formatOnSave": true,
   "editor.formatOnSaveMode": "file",
   "C_Cpp.formatting": "clangFormat",
   "C_Cpp.clang_format_path": "[CONDA_ENV_DIR]/bin/clang-format",
}
The set of options above configure both the CMake extension and the automatic formatting of C++ source files using the clang-format utility included in the Karabo Framework Conda environment (it is important to use the utility instance in the Conda environment to avoid any incompatibility with the clang-format used by the CI pipelines).
For the cmake.buildDirectory parameter, replace [BUILD_DIR] with any valid directory name of your preference, e.g., “build_debug_karaboCpp”. The ${workspaceFolder} is a reference to a variable kept by VSCode and should be left as is. The parent folder reference is optional, but has been left in the example as a reminder on using build directories that are outside the source tree, which is a good practice. If you opt for using build directories inside the Framework’s source tree, please make sure that your choice for build tree is properly configured in .gitignore. The cmake.sourceDirectory informs the VSCode CMake extension about the location of the main CMakeLists.txt file. If this parameter is not specified, VSCode will complain about not finding a CMakeLists.txt file in the root of the workspace and will prompt you to manually chose the main CMakeLists.txt among all the CMakeLists.txt files it finds in the workspace.
[CONDA_ENV_DIR] should be replaced by the directory where the Conda environment created in the previous step is located. To get its path, issue the command:
conda env list
The value to use for [CONDA_ENV_DIR] will be the path to the right of the environment karabo-cpp on the command output.
[KARABO_FRAMEWORK_INSTALL_DIR] can be any writable location on your system. This is where an installation tree with the artifacts resulting from the CMake build will be installed when cmake –build . -target install or make install are executed from the [BUILD_DIR].
An example of a configured settings.json:
{
   "cmake.buildDirectory": "${workspaceFolder}/../build_debug_karaboCpp",
   "cmake.sourceDirectory": "${workspaceFolder}/src",
   "cmake.configureSettings": {
         "CMAKE_PREFIX_PATH": "/home/bob/miniconda3/envs/karabo-cpp",
         "CMAKE_INSTALL_PREFIX": "${workspaceFolder}/../install_framework",
         "CMAKE_BUILD_TYPE": "Debug",
         "BUILD_UNIT_TESTING": 1,
         "BUILD_INTEGRATION_TESTING": 1
   }
   "editor.defaultFormatter": null,
   "editor.formatOnPaste": true,
   "editor.formatOnSave": true,
   "editor.formatOnSaveMode": "file",
   "C_Cpp.formatting": "clangFormat",
   "C_Cpp.clang_format_path": "/home/bob/miniconda3/envs/karabo-cpp/bin/clang-format",
}
The settings.json file above will be scoped for the VSCode workspace. All the configurations shown above are for the CMake Tools extension for VSCode. Now open the local Karabo Framework repository working folder in VSCode by issuing the following commands:
cd [KARABO_FRAMEWORK_DIR]
code .
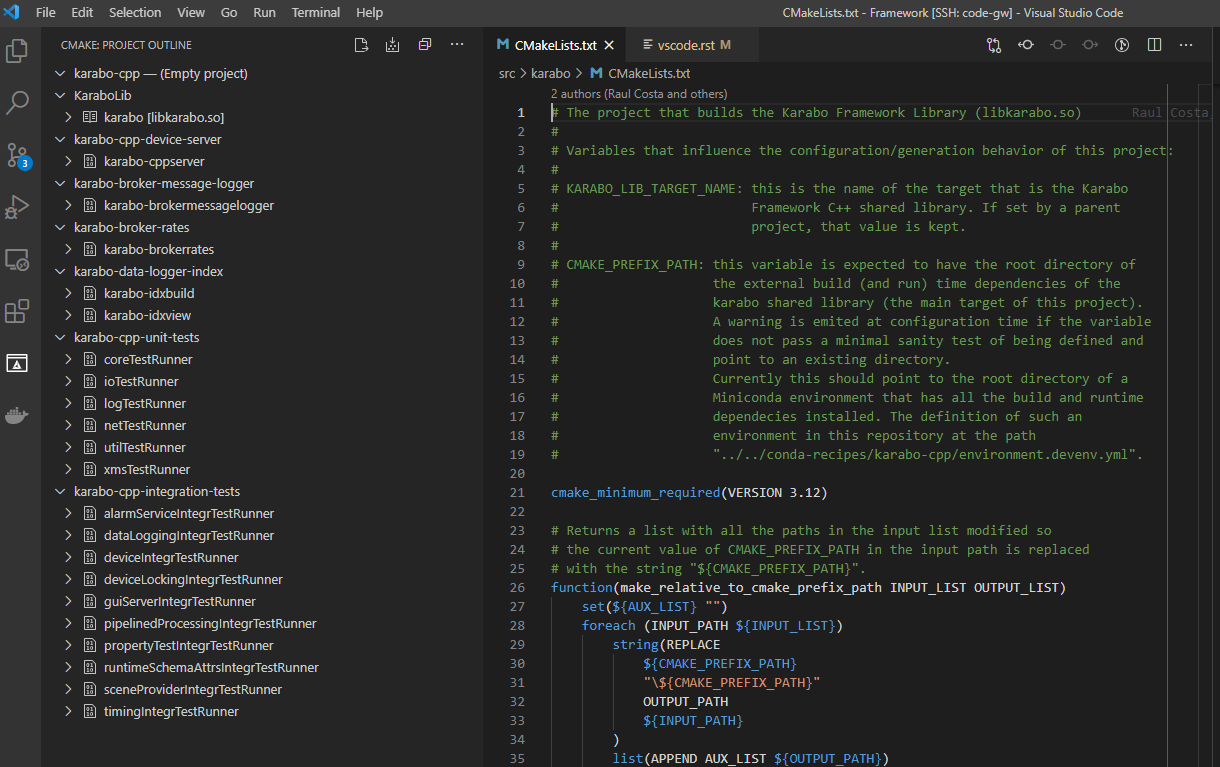
VSCode should find the CMakeLists.txt file in the src folder of the Karabo Framework working folder and ask you if you want to configure the CMake project. Just say yes. Once the CMake project has been configured, you should see the following contents in the CMake Project Outline view of VSCode:
2. Using your VSCode Environment
2.1. Build the Karabo Framework
To build the whole Karabo C++ Framework, please select the Build All Projects in the CMake Project Outline view (highlighted in yellow in the image below).
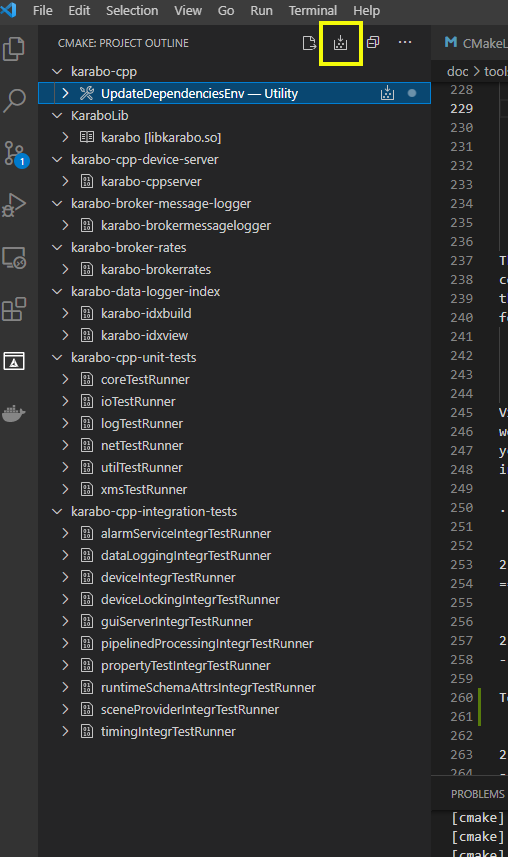
If your CMake Project Outline view happens to empty, press the Configure All Projects button that is to the left of the Build All Projects button, in the same toolbar. That should execute the configure and generate phases of the Karabo’s Framework CMake project, and populate the previously empty view.
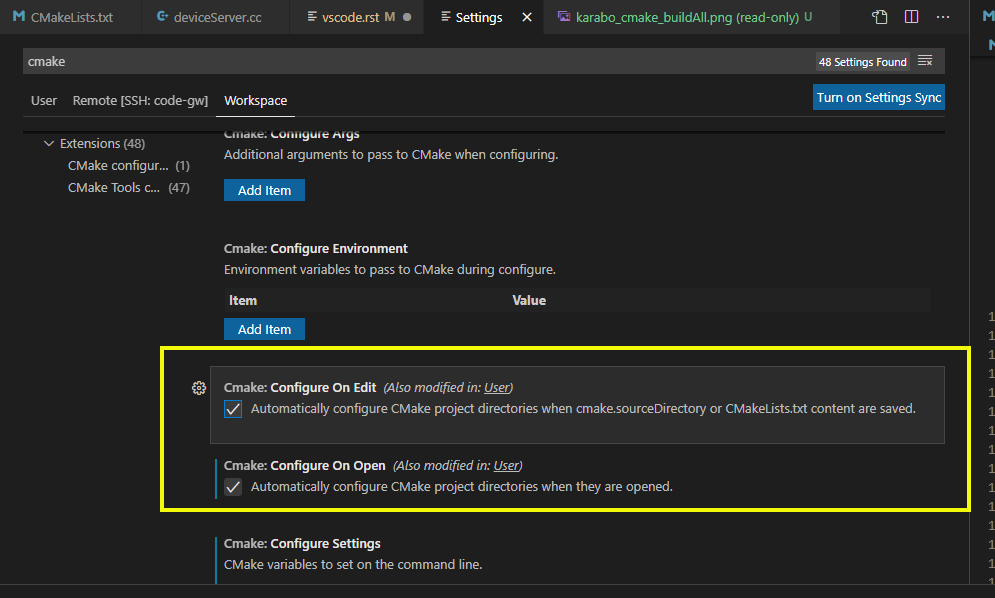
If you don’t want to press Configure All Projects in order to have the CMake project outline updated, please open your Workspace preferences and check that the Cmake: Configure on Edit and Cmake: Configure on Open options are enabled (highlighted in yellow in the image below):
2.2. Run and Debug the Framework Tests
To run one of the Framework unit or integration tests, right-click on its project node in the CMake Project Outline view - one of the *Runner nodes under karabo-cpp-unit-tests or karabo-cpp-intergration-tests in the first image of section 2.1. The context menu will have options to Build, Debug, and Run the corresponding test.
If you prefer to run more than one test at once, please open a terminal, either internal or external to VSCode, go to your build directory and issue a ctest command. In the example below, all tests are run in the default non verbose mode:
cd ../../build_debug_karaboCpp
ctest
It is also possible to run all tests whose names match a given regular expression in either verbose mode (-V option) or extra verbose mode (-VV). In the example below, dataLoggingIntegrTestRunner is the only test run, and in extra verbose mode:
ctest -VV -R "dataLogging*"
Verbose and extra verbose modes cause ctest to output, among other things, one line per successful test case execution. The default verbosity level only emits intermediate reports for failed test cases - the number of successful test cases executed, without their names, is reported at the end of the test execution while in default verbosity level.
To list all the tests that are available for ctest to execute:
ctest -N
ctest also supports a -E option which is the complement of the -R option, meaning execute all tests that do not match the given regular expression.
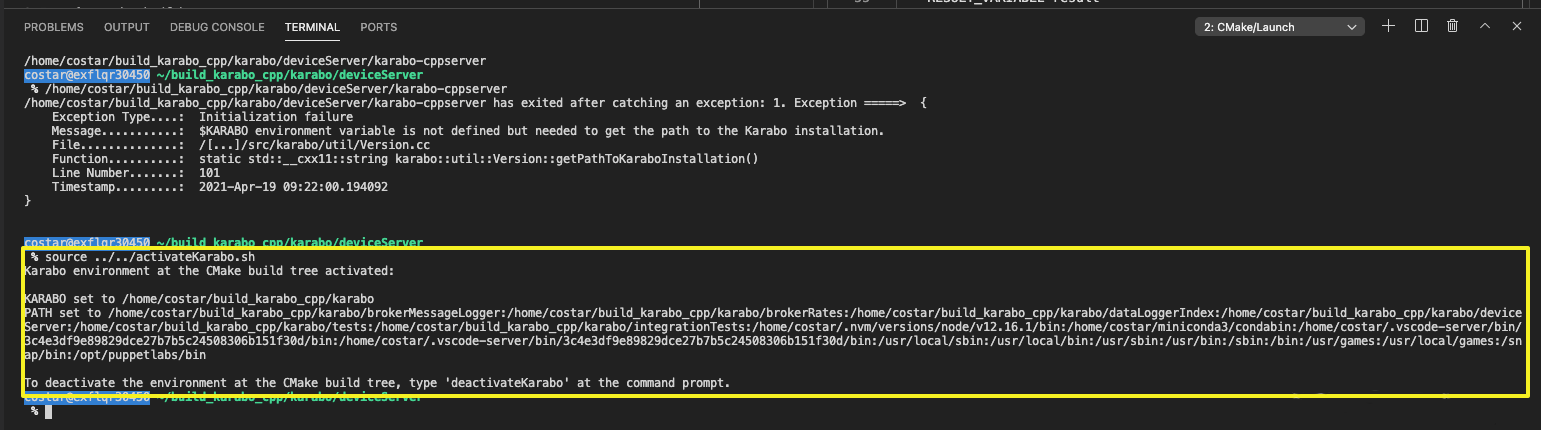
Some tests, especially some of the integration tests, require a KARABO environment properly set. As the CMake build tree is not a full-blown Karabo installation, you will need to source the activateKarabo.sh script before running your test. That script is generated by the CMake build and is tailored to your build tree. There are two ways of establishing a proper KARABO environment in order to run tests and utilities, e.g. karabo-brokermessagelogger, from the build tree:
Launch VSCode from a shell where source [BULD_TREE_PATH]/activateKarabo.sh has already been executed, or,
From the internal VSCode terminal session, execute the command source [BUILD_TREE_PATH]/activateKarabo.sh. Please be sure that you’re issuing the command from the right internal terminal session - the one with CMake/Launch title in the terminal toolbar (picture below).