5. Jupyter hub and notebooks
Documentation based on frequently asked questions
5.1. Usage of Jupyter running on the Maxwell cluster
The easiest way to run Jupyter Notebooks on the Maxwell cluster is to use the JupyterHub portal.
Alternatively, a notebook server can be manually started on Maxwell, and port forwarding can be used to direct a local web-browser to that server.
Both approaches will be explained in the following.
5.1.1. How to access Max-Jhub and select a partition
Log in to Jupyter Hub on the Maxwell cluster using your DESY account. Once logged in, perform the following steps:
Choose a suitable partition on Maxwell from the upper drop-down menu; the choice should target one that your group has access to. Note that if you experience start-up problems with one partition, you may want to try another one.
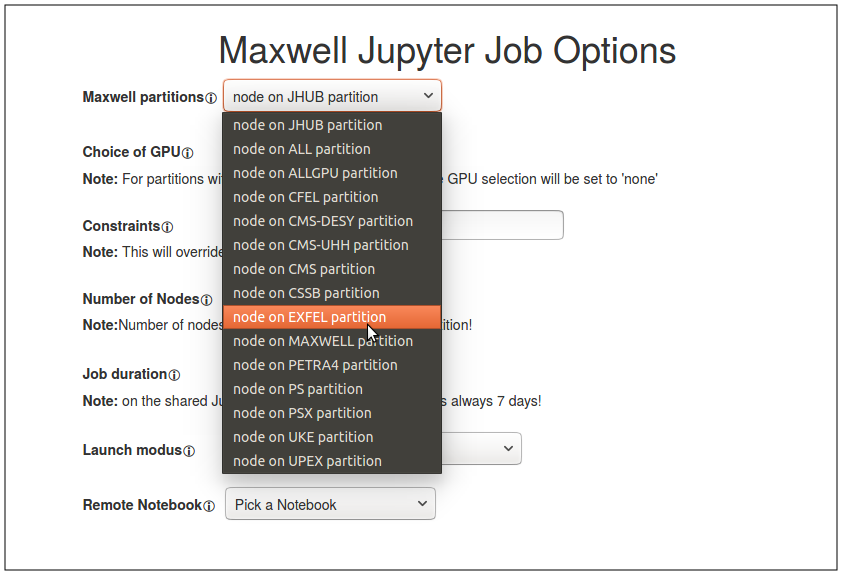
JHUB (Shared Jupyter partition): the default, it will assign a shared node with a maximum time limit of 7 days. This partition is suited for everyone, but your code may run slower and won’t be able to use as much memory as on a dedicated node.
EXFEL: a partition suited for EuXFEL staff. Like all partitions except JHUB, it will assign a dedicated node with a maximum time limit of 8 hours.
UPEX: a partition suited for EuXFEL users.
Select a
Job duration(ignored for the JHUB partition).Click on
Spawn.Browse through your home (
/home/<username>) directory to select or start a new Jupyter project.Jupyter projects stored e. g. on:
/gpfs/exfel/exp/<instrument>/<instrument_cycle>/p<proposal_id>/(usr|scratch)
are also accessible via symbolic link in user’s home directory.
Remember to disconnect by clicking on Control Panel and then
Stop My Server to free the reserved node.
This is the easiest way to run Jupyter Notebooks on the Maxwell cluster (it does not require port forwarding or machine reservations). The xfel kernel includes many useful modules for working with EuXFEL data; this should be available as an option when you create a new notebook.
Some details are explained at https://confluence.desy.de/display/MXW/JupyterHub+on+Maxwell .
5.1.2. How to use Jupyter notebooks on Maxwell with a manual server
The following protocols are useful if you cannot use JupyterHub, or want to have more fine grained control about the resources you use in your notebook session.
To make the Jupyter notebook-server tool available on Maxwell, it is recommended to employ the Python anaconda distribution provided by EuXFEL: To get that Anaconda distribution (based on Python 3) and the Jupyter notebook as an executable into the PATH, the command is:
module load exfel exfel_anaconda3
For example (as of 15 January 2018):
[user@max-exfl001]~% which python
/usr/bin/python                                # this is the linux system python
[user@max-exfl001]~% module load exfel exfel_anaconda
[user@max-exfl001]~% which python
/gpfs/exfel/sw/software/xfel_anaconda3/X.X/bin/python   # xfel anaconda's python
[user@max-exfl001]~% which ipython
/gpfs/exfel/sw/software/xfel_anaconda3/X.X/bin/ipython
[user@max-exfl001]~% which jupyter-notebook
/gpfs/exfel/sw/software/xfel_anaconda3/X.X/bin/jupyter-notebook
[user@max-exfl001]~% jupyter-notebook --version
6.0.3
The `module load exfel exfel_anaconda3` will create a so called jupyter
kernel that makes the all exfel python modules available in jupyter. If you
prefer, you can create your own anaconda installation in your user account.
5.1.2.1. Procedure from inside the DESY network
Request a node just for you to carry out the analysis.
To do this, we need to login to
max-exfl.desy.de, and then use thesalloccommand to request - for example - one Node (N=1) for 8 hours (t=08:00:00) in the upex partition (p=upex):[MYLOCALUSERNAME@COMP]$ ssh USERNAME@max-exfl.desy.de [USERNAME@max-exfl001]$ salloc -N 1 -p upex -t 08:00:00
The system will respond (if it can allocate a node for you) with something like:
salloc: granted job allocation ....
salloc: ...
salloc: Nodes max-exfl072 are ready for job
The node we can now use (for the next 8 hours) is
max-exfl072.In the commands above replace
USERNAMEwith your username on the Maxwell cluster (same as XFEL/DESY user name).See also
Running jobs for more information on slurm commands.
Now we open a new terminal on our local machine
COMPand ssh directly to that nodemax-exfl072. We also forward port 8432 on nodemax-exfl072(or whichever one is assigned) to the port 8432 on our local machineCOMP):[MYLOCALUSERNAME@COMP]$ ssh -L 8432:localhost:8432 max-exfl072
Now we can start the Jupyter Notebook and need to tell it to use port 8432, and not to start a browser automatically:
[USERNAME@max-exfl072]$ module load exfel exfel_anaconda3
[USERNAME@max-exfl072]$ jupyter-notebook --port 8432 --no-browser
Then open a browser window on your machine
COMPand ask it to connect to port 8432https://localhost:8432If you haven’t set a password before, the standard output in the terminal will end with a text block like:
To access the notebook, open this file in a browser:
   file:///home/dallanto/.local/share/jupyter/runtime/nbserver-14812-open.html
Or copy and paste one of these URLs:
   http://localhost:8432/?token=eac81f1482be0112caee9aff8eb13745f976109f0c80f9c6
or http://127.0.0.1:8432/?token=eac81f1482be0112caee9aff8eb13745f976109f0c80f9c6
Only then, after having connected to the server as per (4)., you will get an authentication dialogue like this:
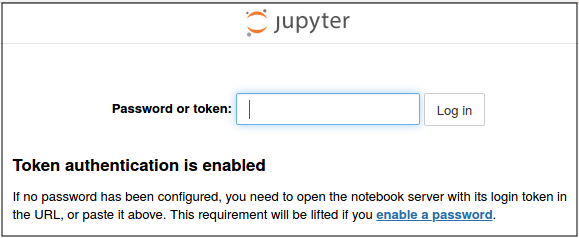
and you have to enter the token (e. g.
c81f1482be0112caee9aff8eb13745f976109f0c80f9c6) by copy-paste from the terminal message.Alternatively, you can enter the entire URL
http://localhost:8432/?token=c81f...into the browser address field, at step (4.), by copy-paste, in the first place. This saves you the extra authentication page.If for some reason the terminal text from the server startup is not available, one can also retrieve the token by typing
jupyter-notebook listto a command-line prompt of the node where the notebook server runs.However, if a password has been set, the authentication dialogue will simplify and you will be asked for that password only.
Summary
request node
then forward port and start jupyter there:
ssh -L 8432:localhost:8432 USERNAME@max-exfl072
module load exfel exfel_anaconda3
jupyter-notebook --port 8432 --no-browser
open browser on local machine (
https://localhost:8432)
5.1.2.2. Procedure from outside the DESY network
If your machine LAPTOP is outside the XFEL/DESY network, you need to
get into the DESY network via bastion.desy.de. In this case, we
recommend that you first ssh to max-exfl (via bastion.desy.de)
to create a node allocation (in our example below for 8 hours):
[MYLOCALUSERNAME@LAPTOP]$ ssh USERNAME@bastion.desy.de
[USERNAME@bastion01]$ ssh max-exfl
[USERNAME@max-exfl001]$ salloc -N 1 -p upex -t 08:00:00
Once this is done, we need to connect a port on your local machine
with the port that the jupyter notebook listens to on
max-exfl072. We need to go via bastion, i.e.
[MYLOCALUSERNAME@LAPTOP]$ ssh -L 8432:localhost:8432 bastion.desy.de -t ssh -L 8432:localhost:8432 max-exfl072
[USERNAME@max-exfl072] module load exfel exfel_anaconda3
[USERNAME@max-exfl072] jupyter-notebook --port=8432 --no-browser
Then open a browser with URL https://localhost:8432 on local machine
LAPTOP.
5.1.2.3. Procedure from hutch computers - proxy issue
The hutch computers are isolated from the internet, but it is possible to set a proxy to access the internet - including max-jhub.
To fix this you must disable the SOCKS proxy, the correct settings are:
Open preferences
Scroll down, click network settings
Tick “Manual proxy configuration”
Set the HTTP Proxy to
exflproxy01.desy.deand the port to 3128Make sure that the “SOCKS Host” and “Port” entry is empty
Tick “Also use this proxy for FTP and HTTPS”
Select OK to save these settings
Note that there is an additional issue with Firefox where, even though you
deleted the url and the setting was applied, the UI still shows an entry. If
this happens you can check the actual setting by going to about:config in
Firefox, searching for network.proxy.socks, and deleting the values for
network.proxy.socks and network.proxy.socks_port.
5.1.2.4. Technical comments
You can ignore the comments below unless you run into difficulties, or what to get more background information.
If your laptop is connect to eduroam, you are outside the XFEL/DESY network, and need to follow instructions in From outside the DESY network.
We have used 8432 as the port in the examples above. There is no particular reason for doing so, other than the port not being used by any other famous software (see list on Wikipedia), and the port number being greater than 1024.
You can chose other ports as you like. Using different ports also allows to run multiple Jupyter Notebook servers on the same node (each listening to a particular node).
By default (i.e. if we don’t use the
--portswitch when starting the Jupyter Notebook), port 8888 is used.
5.2. Usage of Jupyter running on the EuXFEL online cluster
Once logged into a machine in one of the online cluster nodes available (check Online cluster for the proper host aliases), you can use Jupyter either:
Directly from the node of the instrument itself by running Firefox from a terminal and going to the node name + .desy.de (e.g.
sa1-onc-spb.desy.de). It should take you directly to the Jupyterhub page from where you can login with your credentials.The Jupyter instance will run from the node itself, meaning that the rendering could not be optimal.
On your local computer after you forward the necessary ports. This port-forwarding will be slightly different depending if you are inside or outside the control network:
Outside the control network (e.g. from your office pc), a double port-forwarding will be necessary:
ssh -L 8000:localhost:8000 exflgateway -t ssh -L 8000:localhost:8000 sa1-onc-fxeBy using the port 8000, you will be able to open an instance of Jupyterhub service directly on the browser of your local machine if you go to:
http://localhost:8000and login with your credentials.
Inside the control network (e.g. from a control room computer):
ssh -L 8000:localhost:8000 sa1-onc-fxe
5.2.1. Manual Jupyter notebook server on online cluster nodes
If you are using a shared access node during shifts, it is also possible to manually start a Jupyter instance from inside the control network (e.g. from a control room computer).
The more straight-forward way is to render Jupyter on the node itself. In order to do so, firstly you need to load the notebook-server tool available on Maxwell (see Start manual server) by typing:
module load exfel exfel_anaconda3
Once loaded, you can simply type in the terminal:
jupyter-notebook
to start a Jupyter session.
If you need better rendering, you must forward ports in order to use the browser of your local machine. To do so, type on your local machine:
ssh -L 8008:localhost:8008 sa1-onc-03
After loading the notebook-server tool (see above), you will be able to render the Jupyter notebook session, running on the remote node (sa1-onc-03, on the browser of your local machine by typing:
jupyter-notebook --port 8008 --no-browser
And opening in the browser the following URL:
http://localhost.8008