4. Controlling the FastCCD Detector
4.1. Control Software
To operate the camera, the user manual should be followed at all times. If you are unsure on what to do, contact an expert first.
4.1.1. Opening Scenes
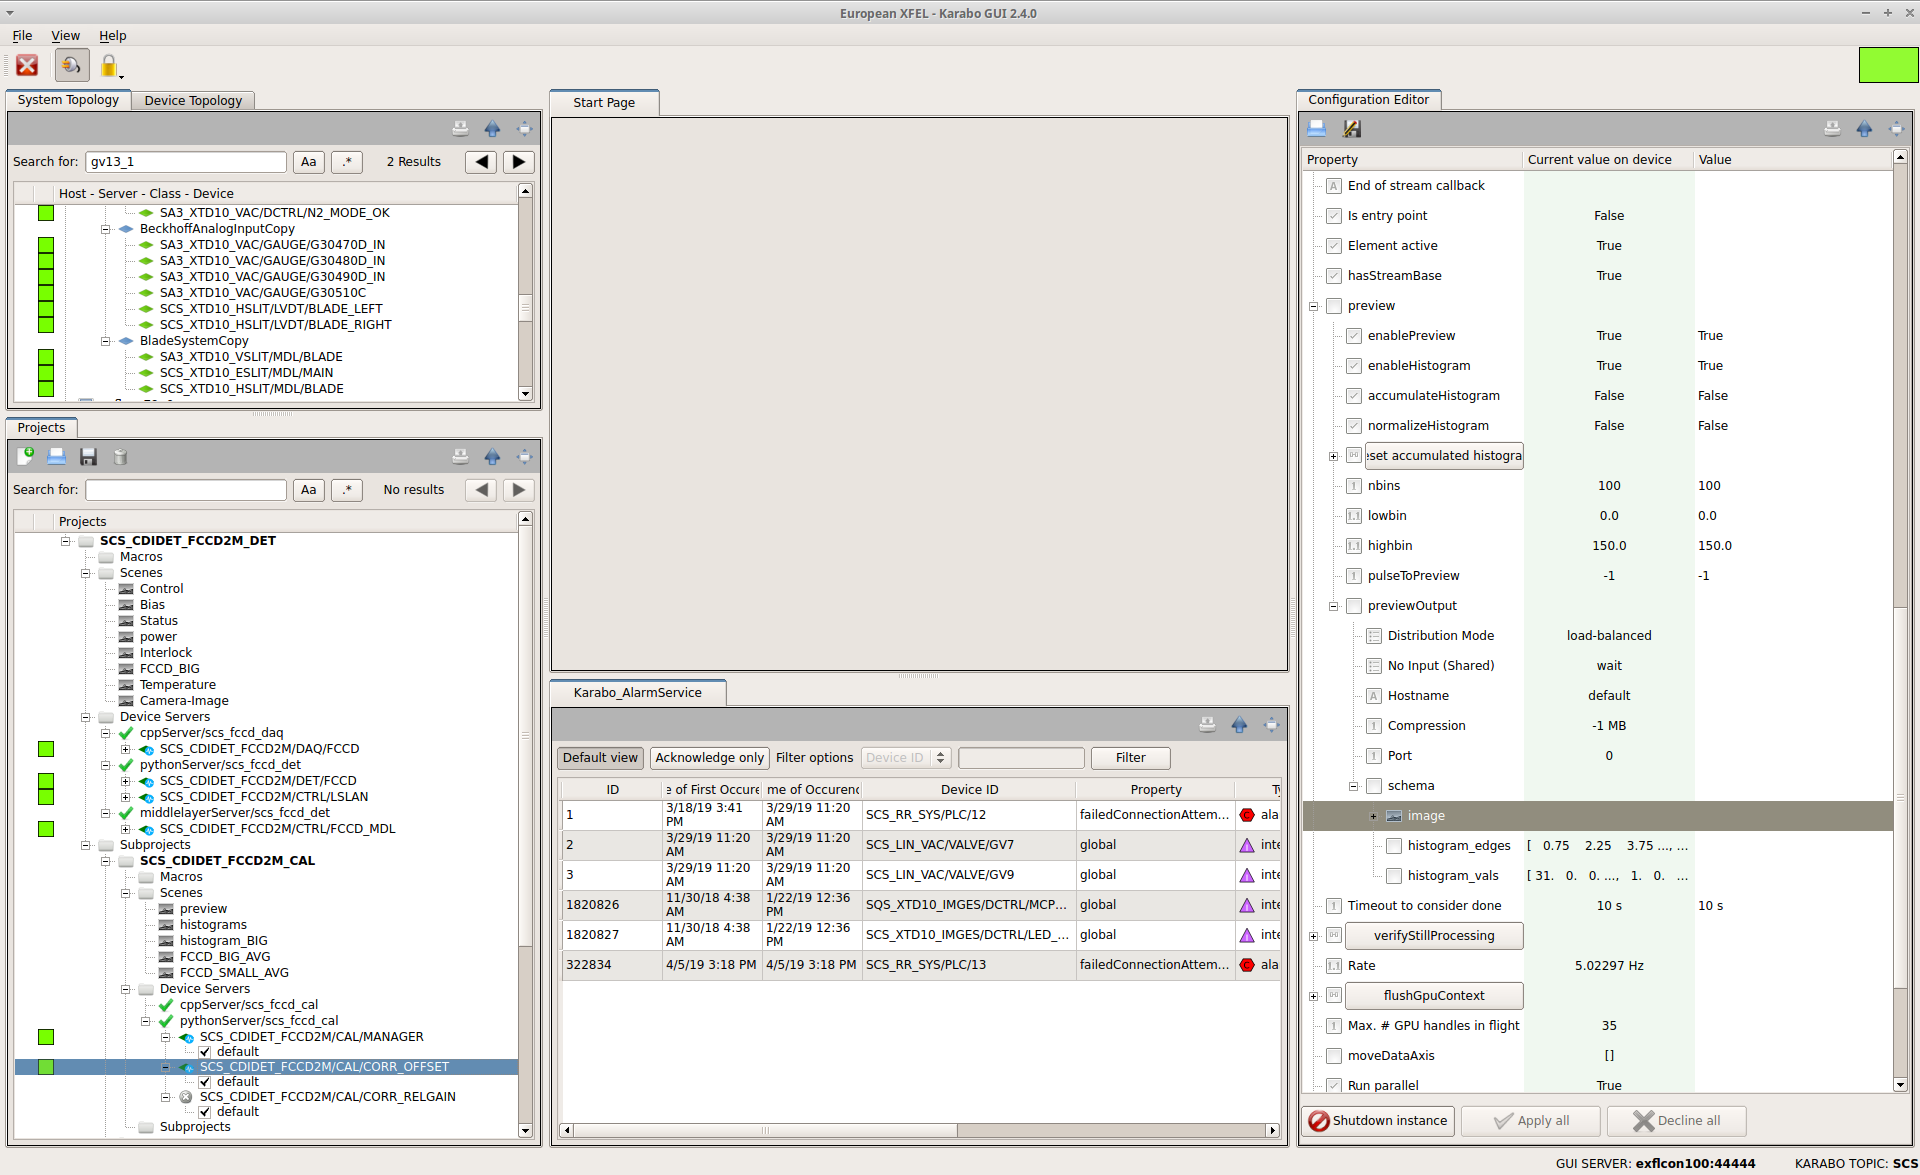
The FastCCD Karabo project (SCS_CDIDET_FCCD2M_DET, see Fig. 4.1) contains the following scenes:
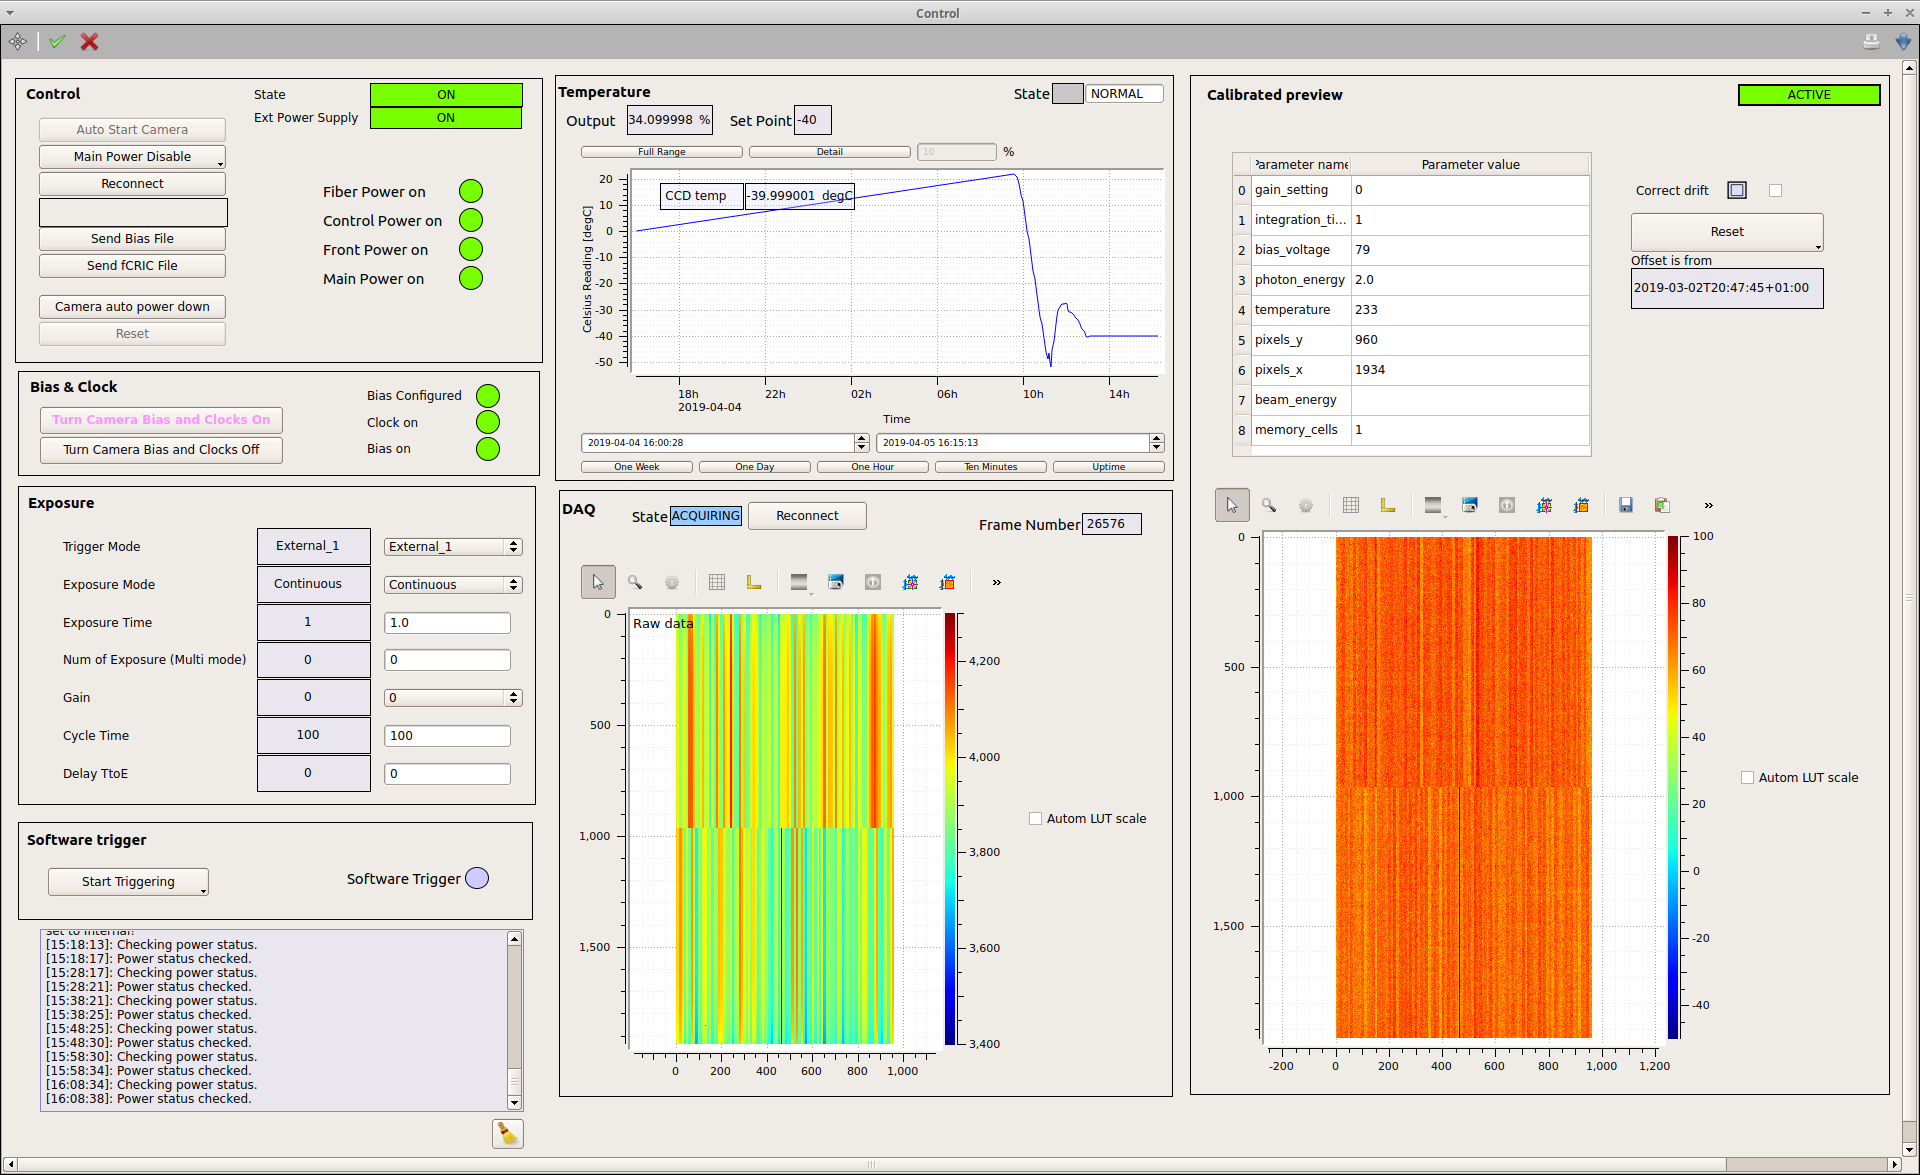
Control with all that is required for the routine operation of the detector, see Fig. 4.2. The instructions on how to turn on the camera are found in Section 4.2 and in the following.
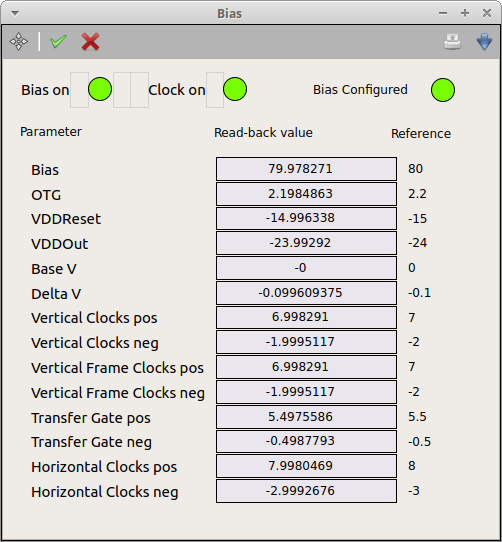
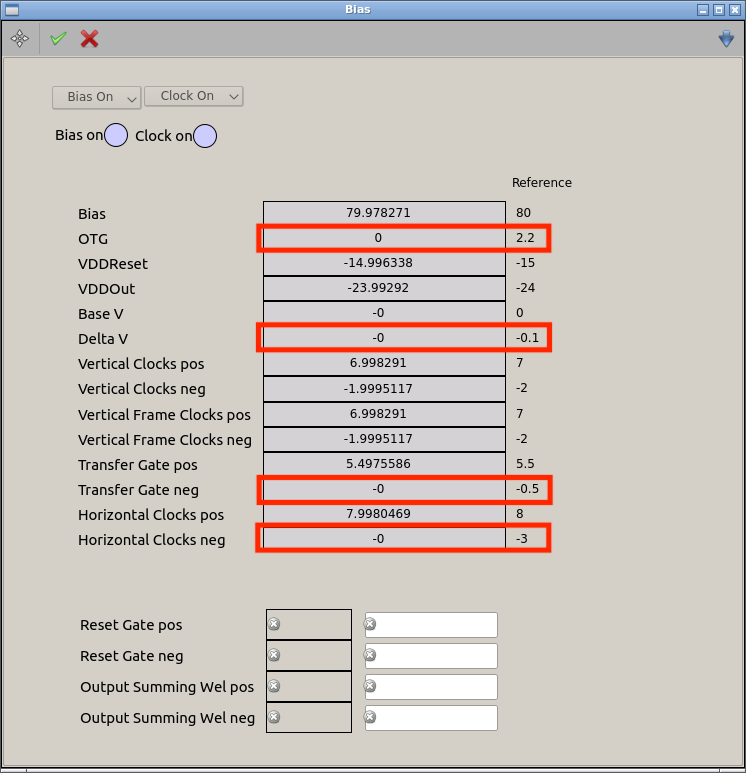
Bias: This scene is required to check that the correct voltage settings have been received every time the “Send Bias file” button is pressed, see Fig. 4.3.
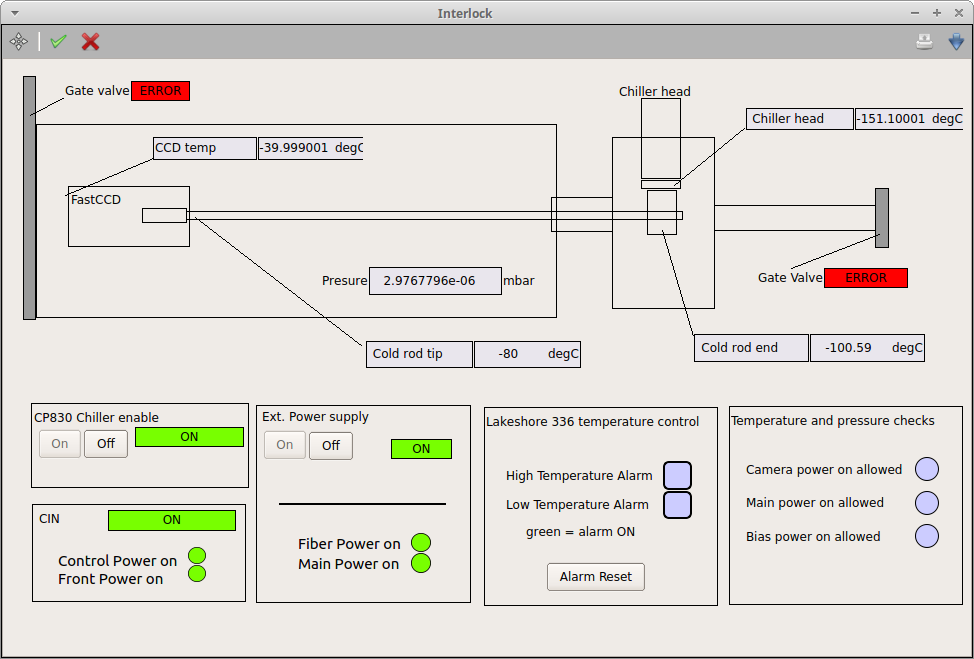
Interlock: This scene has all the information on the interlock conditions and the sensors used by them, see Fig. 4.5. Every time something is in an error or interlocked state or does not seem to respond to the commands sent via karabo, check this scene to find out if any alarm is on.
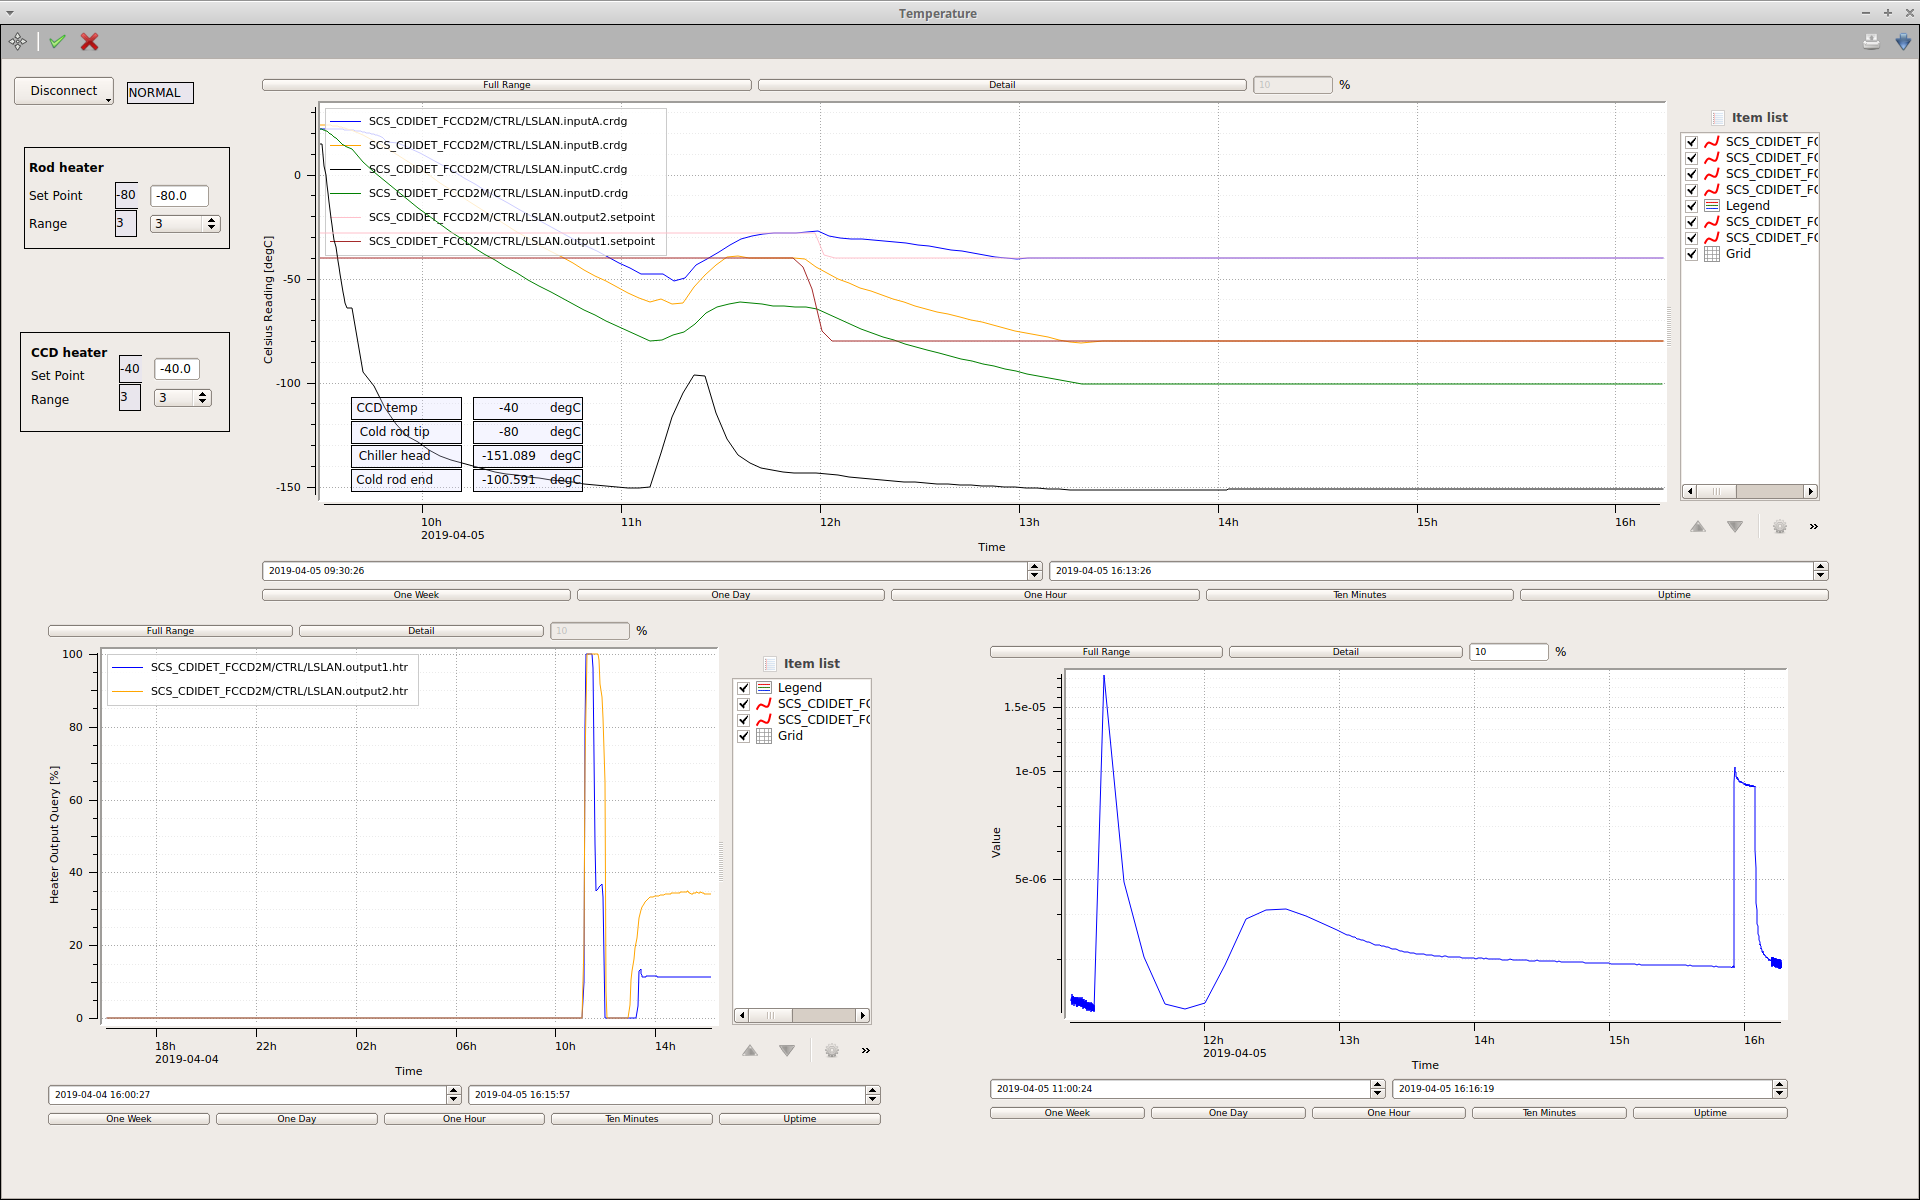
Temperature: This scene (see Fig. 4.6) can be used to monitor the temperature sensors in the system, as well as setting the temperatures and heater ranges. Channel A is always the CCD temperature and channel B is usually the temperature of the cold rod. The position of the temperature sensors is shown in the Interlock scene.
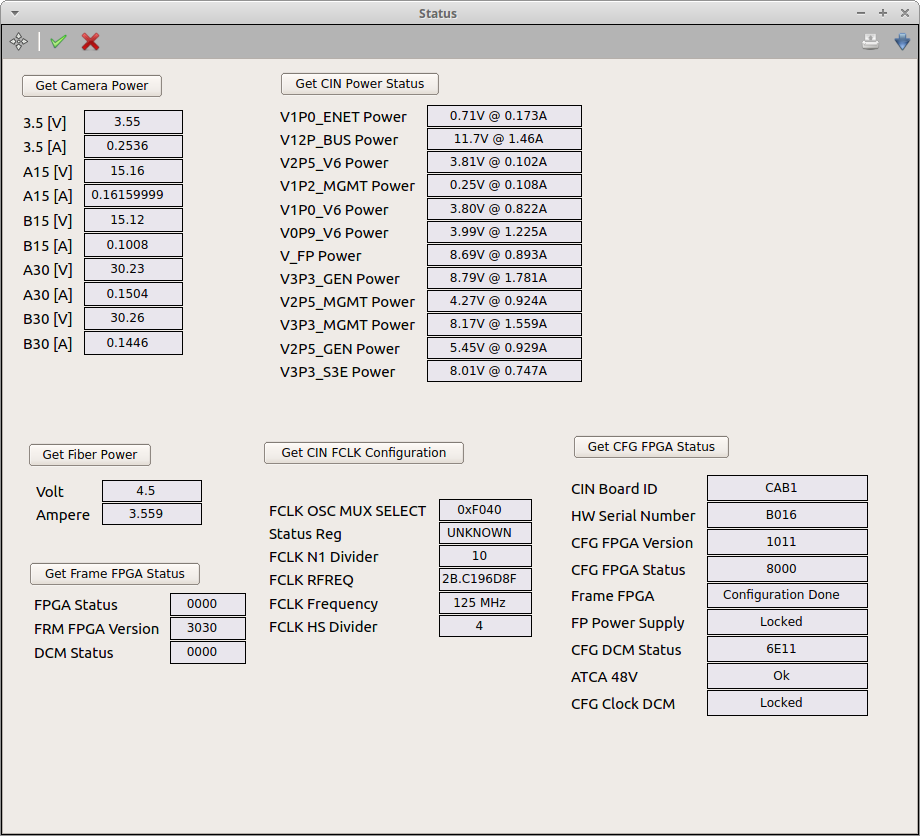
Status: This scene (Fig. 4.7) presents the setpoints and readback values for the voltages and currents of different parts of the system. Check this scene to find out whether or not the detector is ON and configured.
4.1.2. Configuration
The camera needs 4 configuration files:
- Firmware file: is uploaded during the auto-start procedure.
- Timing file: Defines how the camera operates and the picture size. It is also updated during the auto start procedure.
- Bias file: Contains the bias value settings.
- fCRIC file: Configures the camera readout electronics.
Bias and fCRIC files should be sent each time the camera main power is cycled (turned off and on again). Other values are related to the exposure and trigger settings, like the exposure mode, the exposure time and the number of images.
4.2. Camera Setup
Follow the instructions below to get the detector ready for acquisition.
Make sure that the chiller is running, the Lakeshore is on, karabo is connected to it, and is reading the temperatures. The CCD temperature should be below 0 degC but above -30 degC (see Section 6.2). The pressure on the FastCCD part of the beam-line should be below 1e-3 mbar.
After each step, wait for the device to come out of the CHANGING state. The status of the device gives some feedback and information about the ongoing or finished task.
4.2.1. Safety Checks
For safety reason, some buttons (Camera On, Main Power On, Bias On) will be disabled if the temperature/pressure is outside the specified conditions.
| Max. Temp (degC) | Min. Temp (degC) | Max Pressure (mbar) | |
| Camera On | 0 | -30 | 1E-4 |
| Main Power On | 0 | -30 | 1E-4 |
| Bias On | -10 | -30 | 1E-4 |
4.2.2. Power On Camera
Press “Auto start Camera”:
This will call the auto start procedure defined in the dependency. Once this has finished, exposure related settings that are set in the GUI are sent to the camera. Wait for the state to go back to ACTIVE before the next step (it should take ~40s).
Press “Main Power Enable”
Then wait for the state to go back to ON. Note that nothing will be printed in the status field.
Quickly adjust the heater settings
As soon as the main power is on, you have to change the rod heater setpoint (see Section 6.2). Make sure that the heater range is set to 3.
Click “Reconnect” to configure the detector to send data to the DAQ device server.
4.2.3. Prepare the Camera for Data Acquisition
Once the camera is on and the CCD temperature is stable to at least 0.1 degC, follow these instructions to start taking data:
Make sure the trigger mode is set to Internal.
Press “Send Bias File”. The bias file has to be sent each time the camera is power cycled and before turning the bias on.
Check the bias uploaded values:
After the bias values have been sent to the camera, a read-back is performed and the values are automatically compared to the expected values for the given bias file. ALWAYS check manually: open the Bias scene and check that the read-back values match the reference values (within a few %). If some values have not been transferred properly, send the Bias file again.
Danger
If you operate the camera with the wrong bias voltage settings, you may damage the CCD.
Make sure that you are not sending any trigger
Check that the Trigger mode is set to internal.
Press “Send fCRIC File”. The fCRIC file has to be sent each time the camera is power cycled and before turning the bias on.
Danger
the camera should not receive any trigger while sending the fCRIC configuration file or the data acquired will be corrupted in a subtle way. This is not trivial to catch or recover from.
Press “Turn Camera Bias and Clocks On”
and confirm that you want to perform the operation and wait for the Clock and Bias indicators to become green.
Note
If the temperature is already below -30 degC, the electronics might be too cold to react so the system will refuse to turn the bias voltage on. In that case, let the system warm up and try again.
Change the heaters set-points
As soon as you have turned the bias on, you have to adjust the rod heater setpoint (see Section 6.2). Ensure that the heater range is set to 3. Usually you want to cool down the camera to the nominal data-taking temperature.
Wait for the camera to cool down to the desired temperature before you take data.
Configure the exposure and timing settings
See the next section for details.
Take the dark runs
Make sure the gate valves are closed (check the Interlock scene). You need a 1 minute-long run (~500 trains) for each gain setting.
4.2.4. Exposure Settings
4.2.4.1. Trigger Modes
The camera can operate with an external trigger. An internal “software” trigger is also available but it is only used for test purposes.
To use the trigger provided by the accelerator set trigger mode to “External_1”. The camera will start receiving triggers immediately. To turn off the triggers set the trigger mode to “Internal”
If you want to add a delay to the external trigger, the instrument can control the delay of the FastCCD trigger. In alternative you can use the Delay ToE field.
4.2.4.2. Exposure
The exposure time, cycle time and delay ToE are expressed in ms. Three exposure modes are available:
- Single
- Acquires a single frame and stops.
- Multi-mode
- Acquires the number of frames specified in Num of exposures and stops.
- Continuous
- Keeps acquiring frames as long as triggers arrive.
The cycle time is the period of the software trigger. Cycle time needs to be longer than exposure time plus readout time (about 40 ms)
Note
If Cycle time is shorter than exposure time plus readout time, the detector behavior will be unpredictable.
4.2.4.3. Gain Settings
The default detector configuration is auto-gain (gain=0): each pixel starts with gain 8, if the readout value saturates the preamps, the gain is switched to 2 and then to 1. The gain can also be set to a specific value for all pixels from the Control scene.
4.2.4.4. Recording Data
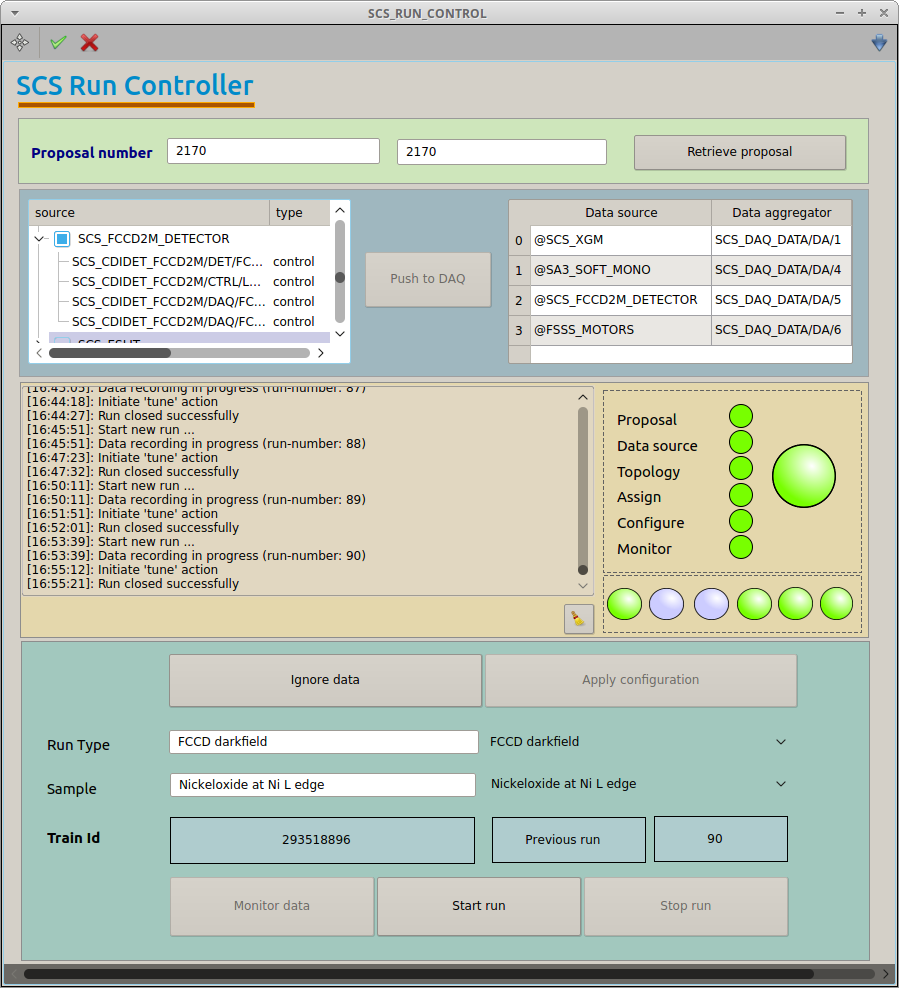
Once the camera is ready, open the SCS_RUN_CONTROL scene (see Fig. 4.8) from the SCS_DAQ_RUN_MGMT subproject. Make sure you have the right proposal number and that SCS_FCCD2M_DETECTOR is selected. If not
- press “Ignore data”.
- retrieve the right proposal.
- add SCS_FCCD2M_DETECTOR to the list of sources and click on the green check mark on the top left corner of the karabo scene.
- press “Push to DAQ”.
- press “Apply configuration”.
- press “start monitoring data”.
Now you are ready to start acquisition. Start sending data from the detector (switch to “External_1” trigger) and start the run.
4.3. Routine Operation
4.3.1. Safe Operation of the Detector
Follow the following guidelines to safely operate the detector.
- The Xray beam should never touch the CCD. Immediately reduce the intensity if the readout is saturated to the point that the charge bleeds into nearby pixels.
- Do not forget to adjust temperature set points at the beginning or end of a shift, or in general when the status of the detector is changed (see Section 6.2).
- Make sure that the bias voltages are configured before turning on the bias voltage. The bias configuration is lost when the detector’s main power is turned off. If you are unsure if the configuration has been sent, just send it again.
- Check the read-back values against the reference values in the Bias scene every time you send the bias file.
- Make sure that the detector is not receiving any trigger when you send the fCRIC configuration file.
- DO NOT leave the camera with bias on at the end of the shift.
4.3.2. Power Monitoring
The main power values for the camera and the fiber optics are constantly monitored.
The values displayed in the power status are evaluated to match certain expectation. If the deviation is too large, an error message is written to the log. Usually the voltages are quite stable but the currents drawn do change when turning the bias voltage on and off. Sporadic errors are of no concern but if you get frequent error messages, contact an expert.
4.3.3. Recover after Error
If any kind of error occurred that could not be handled automatically, the device will go into the ERROR state. If the error is due to a timeout the state will be UNKNOWN.
Pressing the “Reset” button in the Control scene will bring the device into the OFF state and power down the detector. If the camera cannot be powered down correctly (for instance because one of the power supplies is disabled by the interlock), the device may go in ERROR/UNKNOWN status again.
After a reset, you will have to start the power up procedure again. You will have to warm up the CCD above -30 degC (and below 0 degC) in order to do that.
4.4. Shutting Down the Detector
To stop the camera, press “Turn camera bias and clock off”, wait for the “Bias and clock off” message in the status. Put the detector in the “end of shift” configuration (see Section 6.2).
If you want to completely turn off the camera, press “Camera auto power down” and then power off the chiller and set the CCD heater set-point according to Section 6.2.
Danger
Do not turn off the heaters even if you have turned the chiller off, wait for the detector to reach room temperature. Otherwise FastCCD will quickly cool to below -70 degC.
