The Project Panel
The project panel is the rightmost tab of the Navigation Panel, in the Karabo GUI. It is the main access point for interacting with karabo projects and devices in a hierarchical fashion.
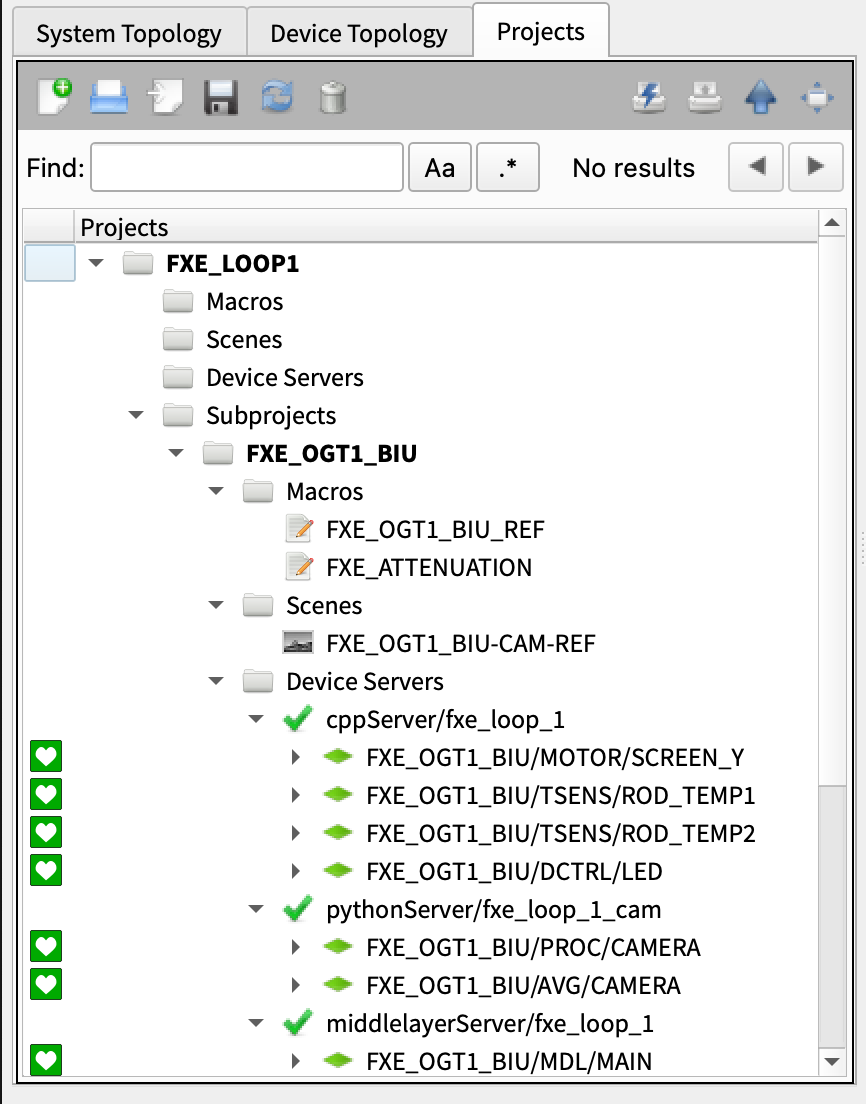
The FXE_LOOP1 project. It contains various objects that can interact with FXE-related devices.
By default, no project is loaded in the project panel.
Projects
A karabo project bundles device servers, device configurations, GUI scenes, macros, and subprojects. It has different categories, which will be explained in the following sections:
Macros
Scenes
Device Servers
Devices
Configurations
Subprojects
A project can be (a) created, (b) loaded, (c) saved, and (d) trashed.
Creating Projects
A project can be created by clicking the create new (sub)project button. A dialog of two fields will appear, which prompts the user to select the domain where the project will be saved in to, and to supply the project title. It is enforced that the title contains alphanumeric, dashes, and underscores only. Though it is best practice to come up with a unique project title, it is allowed to have projects with the same title since each project has a unique identifier (UUID).
Note
Aside from projects, macros and scenes have UUIDs as well! The values can be seen by hovering on these object on the Project Panel.
When a project is successfully created, a single folder with the designated
title will be shown in the project panel. Note that this project is not yet
saved in the domain. The unsaved changes is denoted by a * and a blue title
text. The categories can be seen by unfolding the folder (by clicking the arrow
icon), and are expected to be empty.
Loading Projects
Load an Existing Project
An existing project can be loaded using the “Load Master Project” dialog. The dialog is opened by clicking the “Load an Existing Project” button in the toolbar.
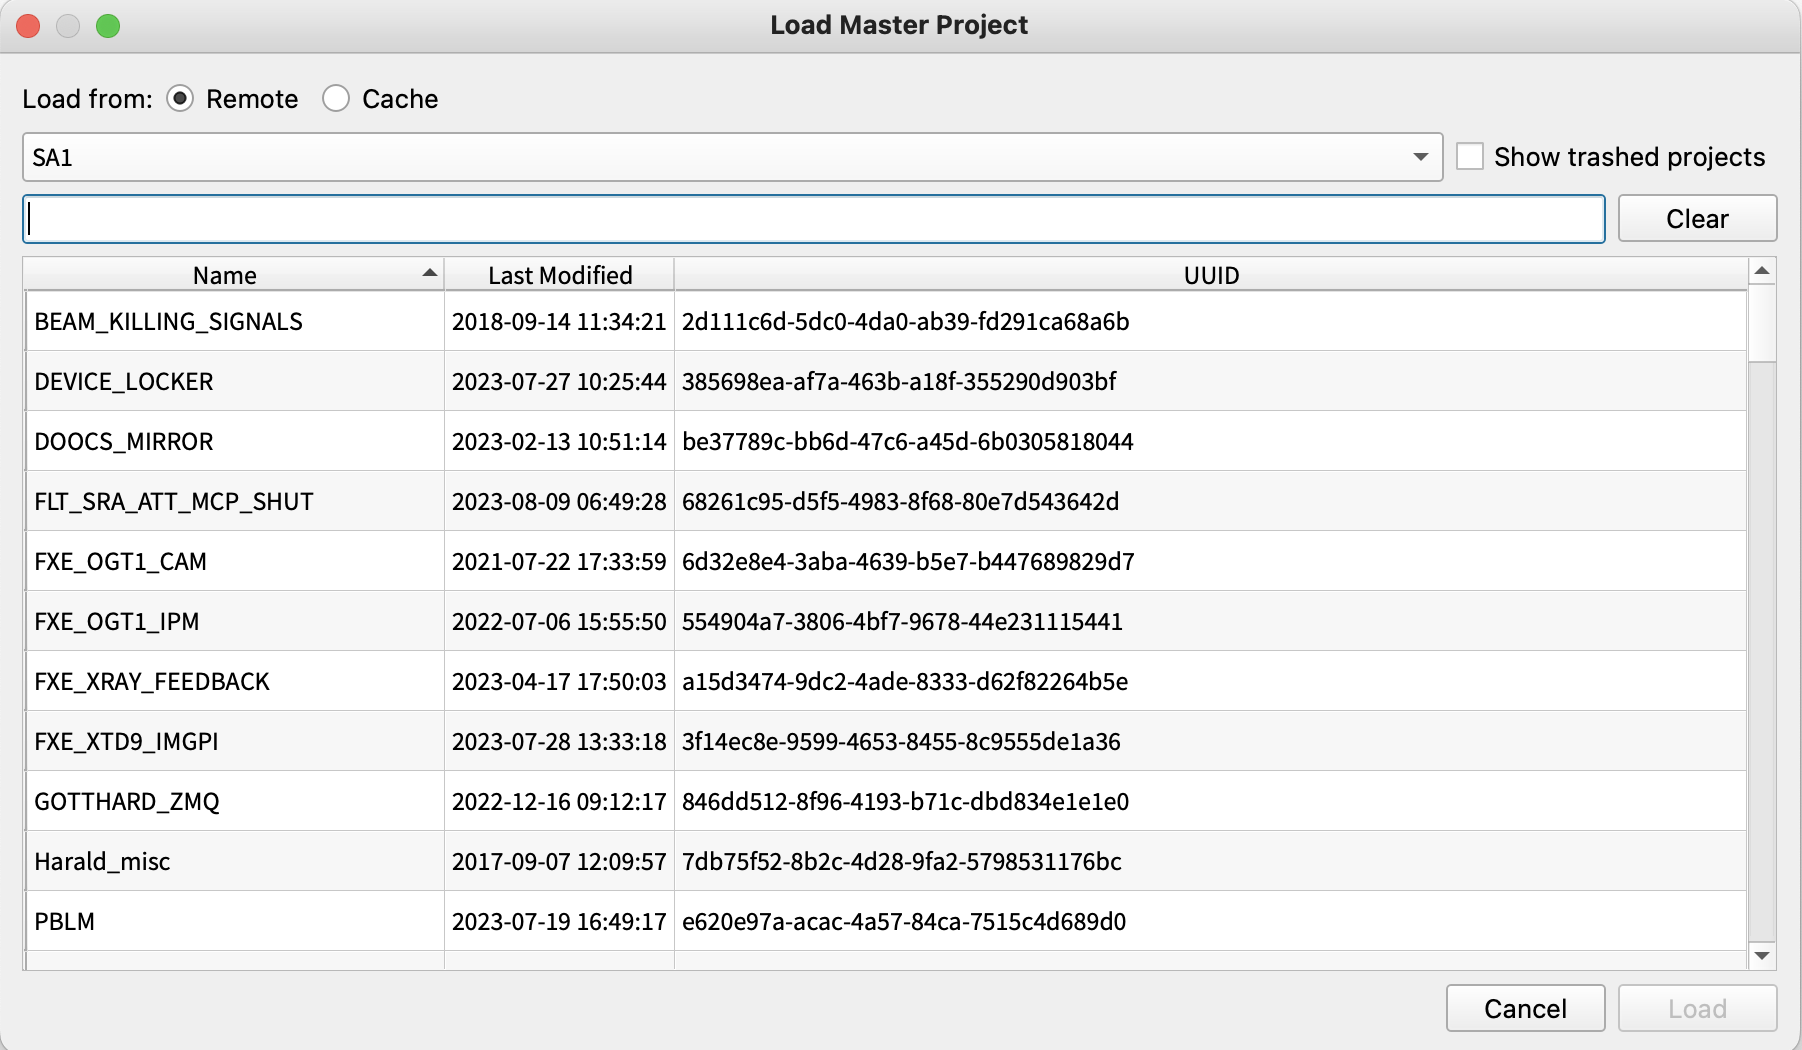
The Load Project dialog showing a selection of the available project in the domain, e.g. SA1.
Note
The selection option cache will allow loading a project from the local disk. It is the latest updated project version from the project database.
In this dialog we can freely select our top-level project to be opened. We can either click a project name directly or search for a project name in the search bar. Technically, after selecting a project our GUI client will request the project data from the project database, routed via the GUI server. During this period we cannot operate with our client, it goes into a busy mode and several options or panels are disabled. This is notified with a spinner widget in the project bar.
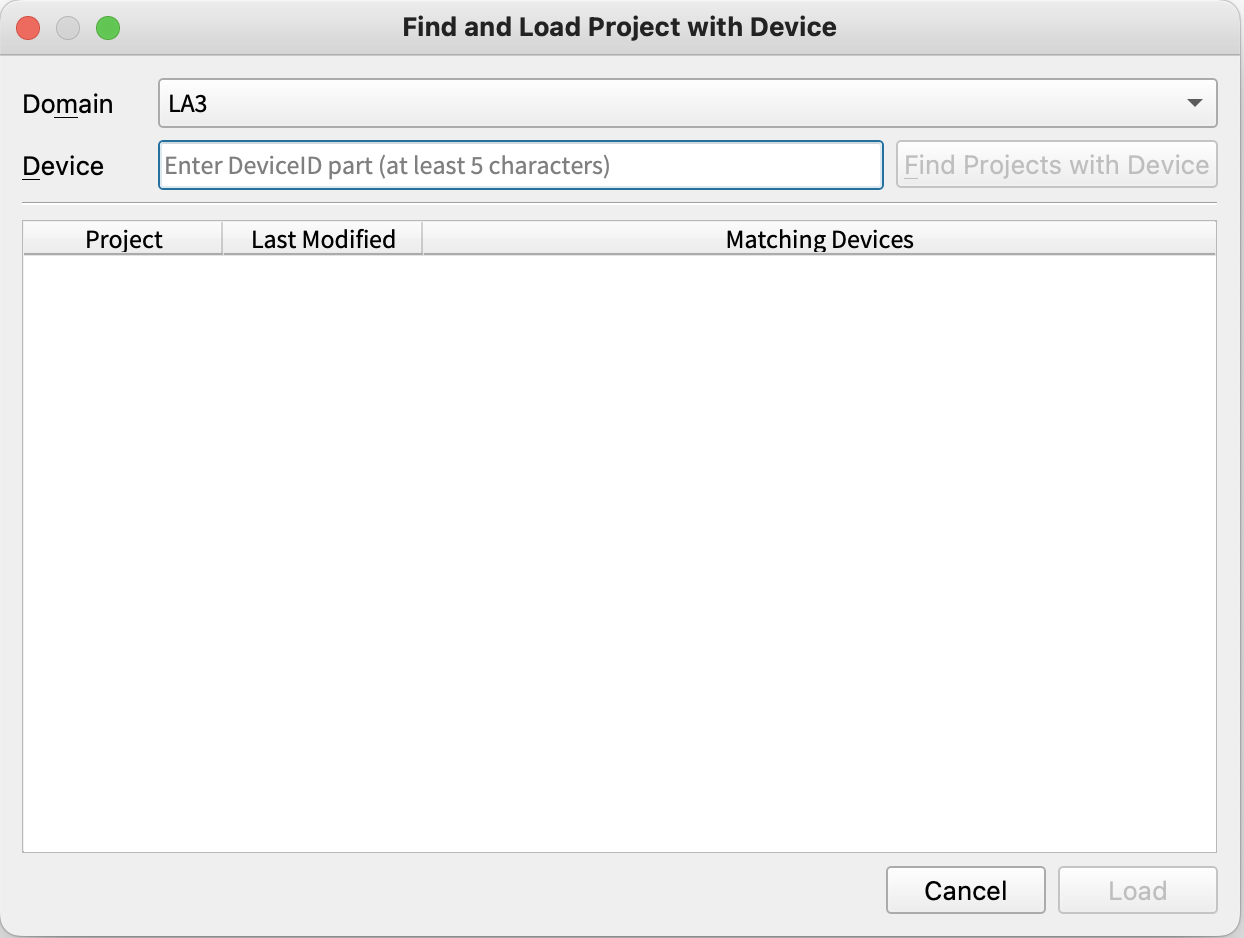
Find and Load Project with Device
The “Find and Load Project with Device” dialog provides an efficient and user-friendly way to locate specific projects associated with devices and seamlessly load them into the Project Panel. The “Find and Load Project with Device” button in the toolbar opens this dialog.
Saving Projects
There is unsaved changes in the project when the project title is denoted by a
* and a blue text. Karabo objects with unsaved changes would also have
the same indication.
Changes in the project can be saved in repository by clicking the Save Project Snapshot button. When the project is successfully saved, the unsaved indication will be removed, returning to a project title/karabo objects with black text.
Alternatively, saving can also be done by selecting the Save option on the project context menu (by right-clicking the Project folder).
The users will also be prompted to save the project with unsaved changes when:
closing the project;
creating/loading a new project;
disconnecting from the server; and,
closing the Karabo GUI.
Trashing Projects
Unwanted projects can be marked as trashed via the Trash Project button. Trashing a project will result to a purple project folder icon, indicating that it is moved in a different repository, namely for trashed projects. This can be undone by clicking the Trash Project button again.
Trashed projects can still be retrieved via the Load Project dialog, with Showed trashed projects selected.
Alternatively, trashing/untrashing can also be done by selecting the Move to trash/Restore from trash option on the project context menu (by right-clicking the Project folder).
Note that such changes are saved automatically.
Renaming Projects
It is possible to rename an existing project with the following steps:
Right-click the Project folder;
Select Rename menu. A dialog will appear.
Supply the new project title.
The new title will be then reflected on the project panel upon successfully renaming the project. Note that such changes are not saved automatically, thus the unsaved changes indication.
Macros
A macro is a Python script that helps communicate with Karabo devices and automate recurring tasks. In the project panel, macros can be (a) added/created, (b) loaded from local, and (c) loaded from device.
Creating Macros
A new macro can be created with the following steps:
Right-click the Macros folder
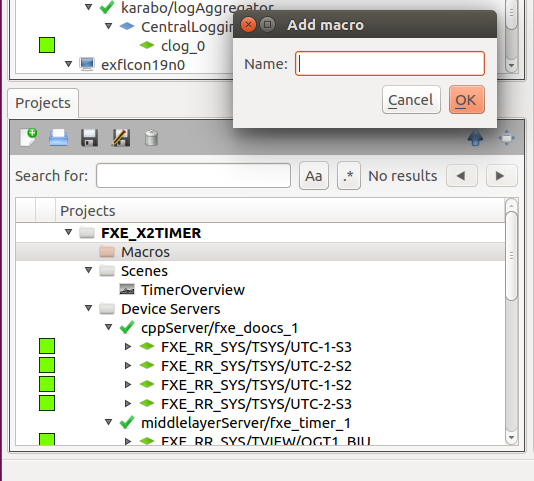
Select Add macro option. A dialog will show up. See figure below.
Fill the dialog with a
macro-name. Note that the name is limited to alphanumeric characters, dashes, and underscores.
By double-clicking on the newly listed macro, its default code will appear in the Macro Panel, which is located in the upper-middle panel of Karabo GUI.
from karabo.middlelayer import Macro, MacroSlot, String

class Example(Macro):
    name = String(defaultValue="Karabo")

    @MacroSlot()
    def execute(self):
        print("Hello {}!".format(self.name))
The above sample code will be generated, which can be freely edited in the Macro Panel. Similarly, as described in HowToMiddlelayer, the macro consists of:
A Macro class
Properties (Karabo descriptors), e.g. String, Float, Double …
Slots to execute public functions
Loading Macros from Local Machines
Macros can be also loaded from local machines as it is a Python script. This can be done by:
Right-click the Macros folder
Select Load macro… menu. A dialog asking for a Python file (
*.py) will show up.Select the macro file to be loaded in the project.
Upon successfully loading the macro, it will be added under the Macros folder with the file name as the macro name. Note that such changes are not saved automatically, thus the unsaved changes indication.
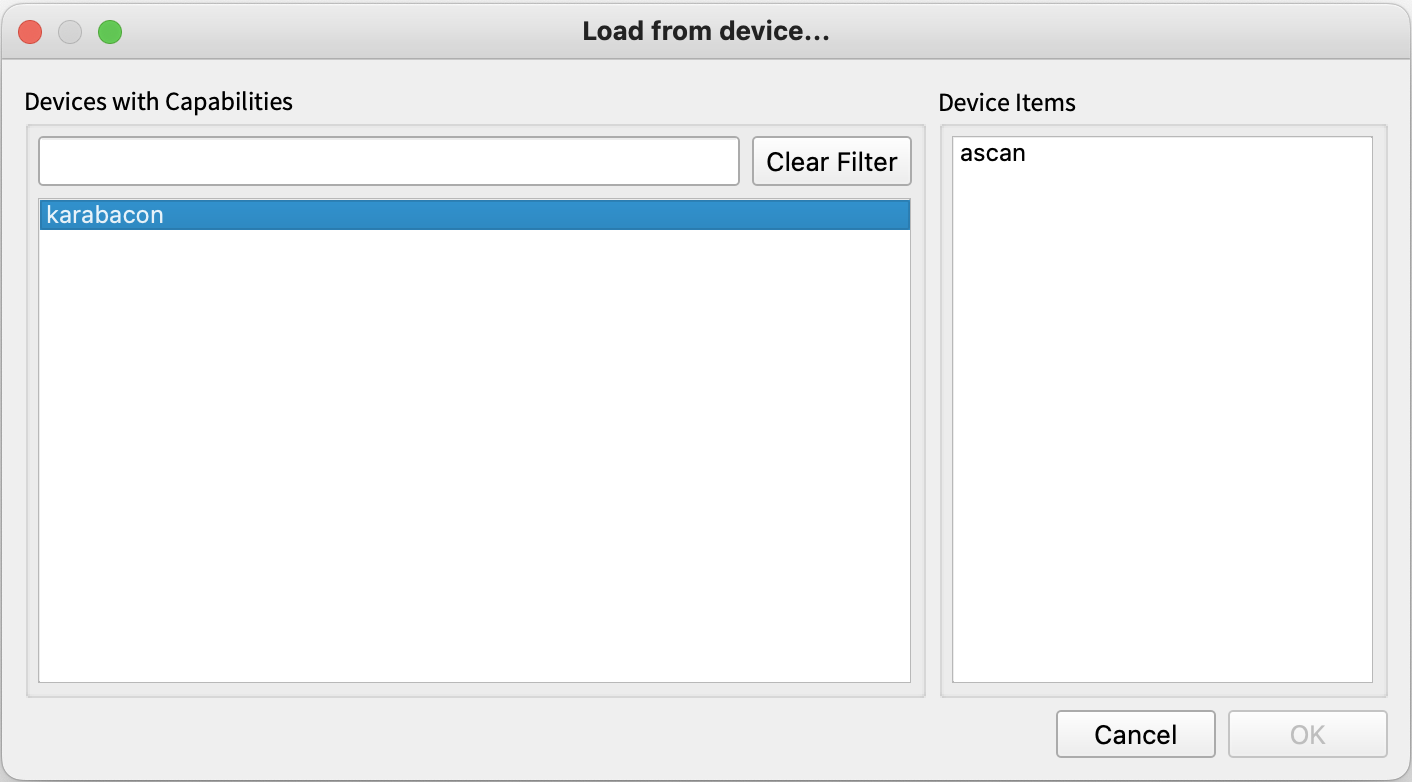
Loading Macros from Devices
Some devices can also provide macros, similarly with providing scenes. These can be loaded in the project by the following steps:
Right-click the Macros folder
Select Load from device… menu. A dialog will show up. See figure below.
Select the desired device and macro from the Device with Capabilities and Device Items, respectively.
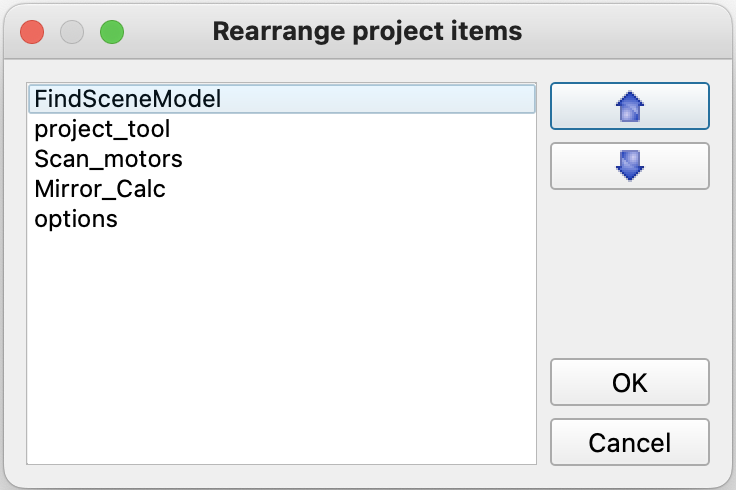
By default, Macros are listed in the Projects Panel in the order they were created. However, the order can be changed using the “Arrange Macros” right click context menu. This opens a dialog with a list of Macros in the project and options to move them up or down.
Working with Macros
Edit
Duplicate
Delete
Save to file
Run
Renaming Macros
Renaming macros can be done with the following steps:
Right-click the Macro object. A context menu will appear.
Select Edit option. The dialog Edit macro will show up.
Supply the new macro Name.
The new name will be reflected on the project upon successfully renaming the macro. Note that such changes are not saved automatically, thus the unsaved changes indication.
Duplicating Macros
Creating multiple copies of the macro on the project can be done with the following steps:
Right-click the Macro object. A context menu will appear.
Select Edit option. The dialog Duplicate object will show up.
Supply the following:
Title or the new macro name for the duplicate(s) (must be alphanumeric, dashes, and underscores only)
Start index of the duplicate(s). This value must be less than or equal with the end index.
End index of the duplicates(s). This value must be greater than or equal with the start index.
The number of copies that will be produced is the difference of End index and
Start index, which is also indicated in the dialog.. Resulting duplicates
will then be listed under the Macros folder with names as
new-macro-name + index.

Duplicating NEW_MACRO with Start Index = 0 and End Index = 2 (left) would result to 3 copies (right).
Note that such changes are not saved automatically, thus the unsaved changes indication for the newly added macros.
Deleting Macros
Macros can be deleted from the project with the following steps:
Right-click the Macro object. A context menu will appear.
Select Delete option. The user will be asked for confirmation.
The macro will be removed from the Macros list upon successfully deleting it. Note that such changes are not saved automatically, thus the unsaved changes indication on the Project.
Saving Macros to File
Macros can be saved as a Python file (.py) on the local machine with the
following steps:
Right-click the Macro object. A context menu will appear.
Select Save to file option. A file dialog will appear.
Locate the folder to save and supply a file name for the macro.
Running Macros
Macros can be run not only on the Macro Panel but also in the Project Panel. This is possible with the following steps:
Right-click the Macro object. A context menu will appear.
Select Run option.
A new macro (device) instance will appear under the Macro object upon successfully running the macro. Clicking on it will show its Configuration in the Configuration Panel. Macros can be instantiated only once, and the running instance must be shut down before instantiating (and accepting changes in the macro code) again.
The macro instance can be shut down from the Configuration Editor (similar with device instances) or by right-clicking the Macro Instance object and selecting the Shutdown option.
Devices
Projects enable easier access on devices. This helps bookkeeping of devices for specific operations, such as collecting FXE LOOP 1 devices in the FXE_LOOP1 project.
This can be done by:
Adding a device server
Adding a device instance
Adding Device Servers
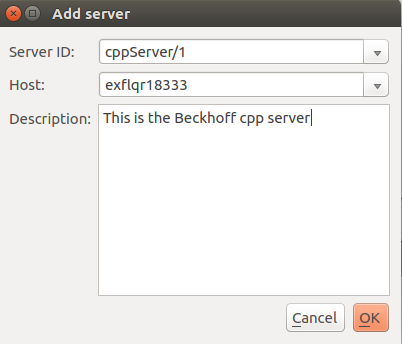
Device servers can be added in the project with the following steps:
Right-click the Device Servers folder. A context menu will show up.
Select Add server option. A dialog will show up. See figure below.
In the dialog, select the Server ID of the desired server from the list of existing servers.
Optionally, select the Host of the chosen server from the list of existing hosts. This is useful for servers that are deployed through Karabo.
Also optionally, add a Description of the server.
Upon successfully adding the device server, it will be added under the Device Servers folder. Note that such changes are not saved automatically, thus the unsaved changes indication.
The server configuration dialog.
Edit
Delete
Shutdown
Add device
Instantiate all devices
Shutdown all devices
Delete all devices
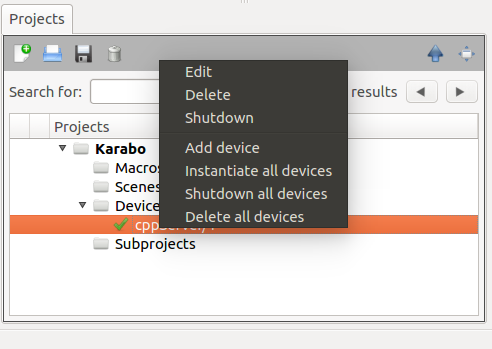
The device server context menu creation dialog.
Editing a server provides the possibility to change the server name as well as the description in the project. Deleting a server can be sometimes necessary if a project gets restructured. The shutdown option will request the device server and all the devices to shutdown gracefully. Once the server has gone down, it will restart and come online again.
It is possible to instantiate and shutdown all devices of this device server. For instantiation, a list of device names is forwarded to the GUI server, who instantiates the devices sequentially, which might take a little bit of time.
In the next chapter the creation and configuration of devices is explained.
Adding Project Devices
Devices can be added on the project with the following steps:
Right-click the Device Server object
Select the Add device option from the context menu. A dialog will show up.
Supply the following:
Device ID or the device name (must be alphanumeric, dashes, and underscores only)
Device class of the desired device. The list is the device classes that can be run on the selected server.
Configuration name, which is set
defaultby default.Optionally, the Description of the device.
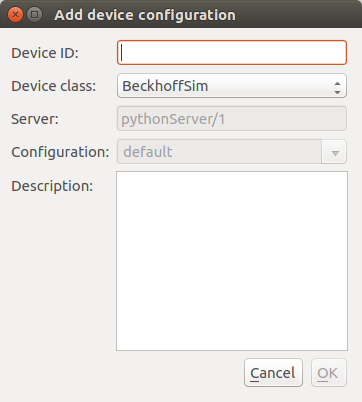
The Add device configuration dialog.
Every device instance has a default configuration, which is created from the configuration derived from device class schema. This configuration is not supposed to be deleted or renamed in the project.
Upon successfully adding the device, it will appear as a child of the selected device server. If the supplied device name already exists in the system topology, the added device in the project will be the existing device (regardless of selected device server and class). Otherwise, a new device instance will be added instead, and is offline by default. Note that such changes are not saved automatically, thus the unsaved changes indication on the project, device server.
Working with Devices
Edit
Configuration
Duplicate
Delete
Open device macro
Open device scene
Get Configuration
Instantiate
Shutdown
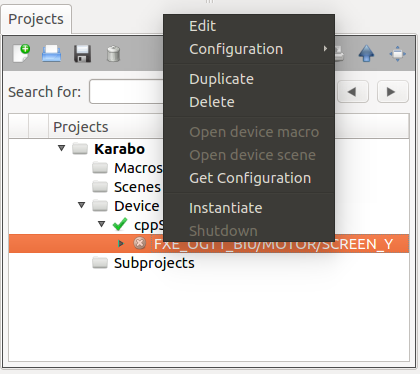
The device context menu.
Depending on the device status, either online or offline, there are different possibilities such as starting an offline device or shutting down an online device.
Project Device status
The status of project devices depends on the availability of the class, the online status of server and the device itself.
icon |
status |
description |
|---|---|---|
|
Offline |
The device is offline |
|
Offline; No Plugin |
The device is offline and the class plugin is missing |
|
Offline; No Server |
The device and the server are offline |
|
Online; Incompatible |
The device is online but the configured device class is different from the device class that is online |
|
Online |
The device is online and did not encounter an error |
|
Online; Error |
The device online and has encountered an error |


Device Configuration
Device configurations can be viewed as children of the device. It is convenient to have various configurations for different experiments. Additional device configurations can be added on an offline device with the following steps:
Right-click the Device object. A context menu will show up.
Hover the Configuration option and select Add device configuration option. A dialog similar with the Add device dialog will show up.
In the dialog, supply the new Configuration name. It should be unique in the device to be added.
Optionally, add a Description of the new device configuration.
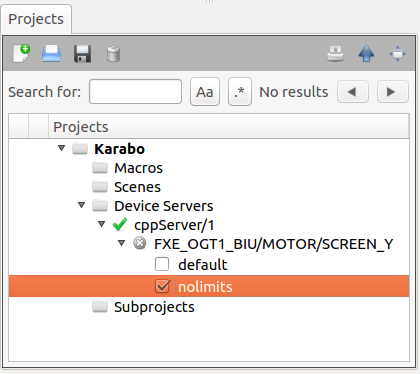
A device with multiple configurations.
In our example, we have created an additional configuration nolimits. The active configuration can be identified by a tick mark and can be swapped by clicking the check boxes next to these.
Note that such changes are not saved automatically, thus the unsaved changes indication on the project, device server, device instance, and device configuration.
Modifications of offline configurations can be done via the Configurator in the configuration panel. Every modified device property or attribute will lead again to a modification of the project. It is important to mention that Karabo only stores offline configurations in the project, however, it is possible to retrieve historic configurations from the data loggers. This can be done via by the following steps:
Right-click the Device object. A context menu will show up.
Select Get Configuration option. A Configuration Timepoint dialog will appear.
Supply the Timepoint (date-time) of the configuration to be retrieved. For convenience, the user can utilize the calendar on the dropdown menu and/or use the preset time buttons.
Upon successfully requesting for the configuration from past, it will appear after a while in the configurator. Depending on whether the device is online or offline, the changes are either highlighted with a blue box and need to be applied or they are merged into the offline configuration.
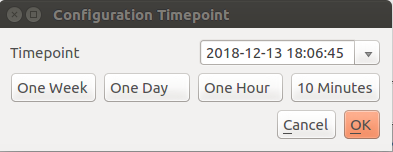
The configuration from past dialog
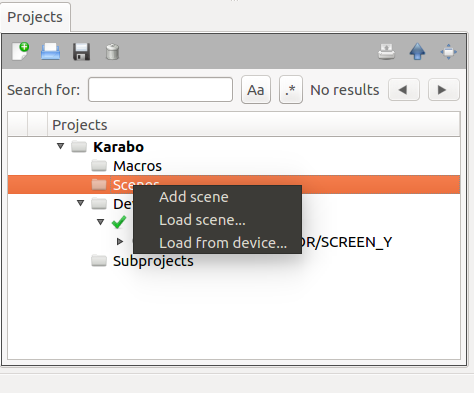
Scenes
Scenes in Karabo provide a way to customise device views, covering any diagnostic or control elements in a compact and comprehensive view. In the project panel, scenes can be (a) added/created, (b) loaded from local, and (c) loaded from device.
The scene context menu.
Adding Scenes
A completely new scene can be easily created and added on the project with the following steps:
Right-click the Scenes folder. A context menu will show up.
Select Add scene option. The Add scene dialog will show up.
Supply the dialog with a
scene-name. Note that the name is limited to alphanumeric characters, dashes, and underscores.
The new scene will now be listed under the Scenes folder upon successfully adding it. Double-clicking on it will show a blank scene in the Scene Panel, which is located in the upper-middle panel of Karabo GUI. Note that such changes are not saved automatically, thus the unsaved changes indication on the new scene object, scene folder, and project folder.
Loading Scenes from Local Machines
Scenes can be also loaded from local machines as it is an SVG file. This can be done by:
Right-click the Scenes folder
Select Load from local… menu. A dialog asking for an SVG file (
*.svg) will show up.Select the scene file to be loaded in the project.
Upon successfully loading the scene, it will be listed under the Scenes folder with the file name as the scenes name. Note that such changes are not saved automatically, thus the unsaved changes indication.
Loading Scenes from Devices
Some devices can provide scenes. These can be loaded in the project by the following steps:
Right-click the Scenes folder
Select Load from device… menu. A dialog similar to the Load macro from device dialog will appear.
Select the desired device and scene from the Device with Capabilities and Device Items, respectively.
Working with Scenes
Opening scenes can be done by double-clicking the Scene object. The scene will then be displayed in the Scene Panel located at the upper-middle panel of the Karabo GUI.
Note that opening scenes cause unsaved changes, thus the unsaved changes indication on the Scene object and the Project folder.
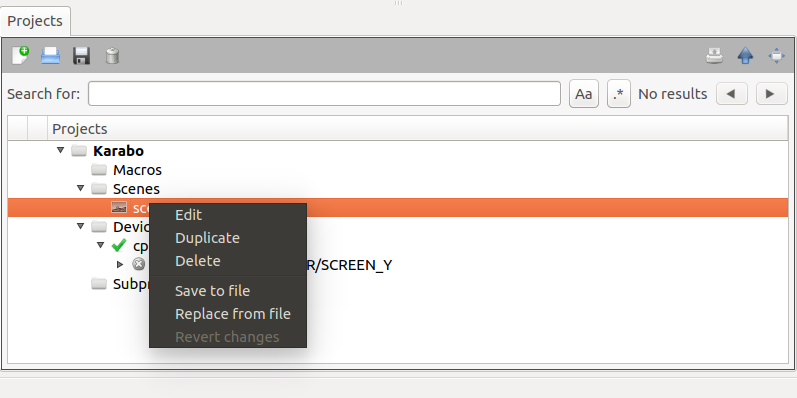
The scene interaction menu
The scene context menu provides very useful features. It is possible to revert changes and replace from file.
Renaming Scenes
Renaming scenes can be done with the following steps:
Right-click the Scene object. A context menu will appear.
Select Edit option. The dialog Edit scene will show up.
Supply the new scene Name.
The new name will be reflected on the project upon successfully renaming the scene. Note that such changes are not saved automatically, thus the unsaved changes indication.
Duplicating Scenes
Creating multiple copies of a scene on the project can be done with the following steps:
Right-click the Scene object. A context menu will appear.
Select Edit option. The dialog Duplicate object will show up.
Supply the following:
Title or the new scene name for the duplicate(s) (must be alphanumeric, dashes, and underscores only)
Start index of the duplicate(s). This value must be less than or equal with the end index.
End index of the duplicates(s). This value must be greater than or equal with the start index.
The number of copies that will be produced is the difference of End index and
Start index, which is also indicated in the dialog.. Resulting duplicates
will then be listed under the Scene folder with names as
new-scene-name + index.
Note that such changes are not saved automatically, thus the unsaved changes indication for the newly added scenes.
Deleting Scenes
Macros can be deleted from the project with the following steps:
Right-click the Scene object. A context menu will appear.
Select Delete option. The user will be asked for confirmation.
The scene will be removed from the Scenes list upon successfully deleting it. Note that such changes are not saved automatically, thus the unsaved changes indication on the Project.
Saving Scene to File
Macros can be saved as an SVG file (.svg) on the local machine with the
following steps:
Right-click the Scene object. A context menu will appear.
Select Save to file option. A file dialog will appear.
Locate the folder to save and supply a file name for the scene.
Replace Scenes from File
Replacing a scene from file is possible when the scene is closed or opened. On this action all scene content from a local file is replaced except the uuid and the simple name. This means that scene links will still work afterwards!
Revert Scenes
Reverting scene changes is translated to replacing the scene with the latest saved scene version in the local cache. A condition for this action is that the scene must be closed.
Subprojects
Projects can link other projects by making them as their subprojects. A project can be added under on the Subprojects folder by a) adding/creating a completely new project, and b) loading an existing project.
Creating Subprojects
Creating a subproject is very similar with creating a project. The main difference is that it will be saved in the the same domain as the current project.
Right-click the Subprojects folder. A context menu will appear.
Select Add new project… option. A dialog similar with creating a project will show up.
Supply the new project title.
The new project will appear under the Subprojects folder upon successfully creating it. Note that such changes are not saved automatically, thus the unsaved changes indication.
Add Existing Projects as Subproject
Linking an existing project as a subproject is very similar with `loading a project <load_project_>`_. The main difference is that the lookup is limited to projects of the same domain as the current project.
Right-click the Subprojects folder. A context menu will appear.
Select Load project… option. A dialog similar with opening a project will show up.
Select the project from the list.
Note
Subprojects are essentially projects that are just linked in another project. Changes that are made and saved in a subproject will always reflect on its links on other projects.