5. DAQ configuration and data taking
In the main GUI open the project SCS(SQS)_DAQ_RUN_MGMT. In the project, open the following scene:
- SQS run controller:
SQS_RUN_CONTROL_GLOBAL_STATE- SQS run controller:
SCS_RUN_CONTROL_GLOBAL_STATE
- In
SCS(SQS)_RUN_CONTROL(see Fig. 5.1), Choose Proposal number: 900210. This is the DSSC commissioning proposal.
Press on ‘Retrieve proposal’.
- Include the correct data sources, in agreement with the beamline personnel. are in addition following slow data source groupes have to be added to the DAQ:
DSSC1M-1 XTDF`- The fast data group for the 16 ladders of the DSSC.DSSC_CFG1- slow data group for FPGA/PPT_Q1,DSSC_CFG2- slow data source for FPGA/PPT_Q2,DSSC_CFG3- slow data group for FPGA/PPT_Q3,DSSC_CFG4- slow data group for FPGA/PPT_Q4,DSSC_INF- General configuration slow data.
Be aware that you have to acknowledge the choice with pressing enter when selecting and deselecting.
Press ‘Push to DAQ’.
Press ‘Apply Configuration’.
Press ‘Monitor data’ and check
SCS(SQS)_DAQ_RUN_CONTROLscene.
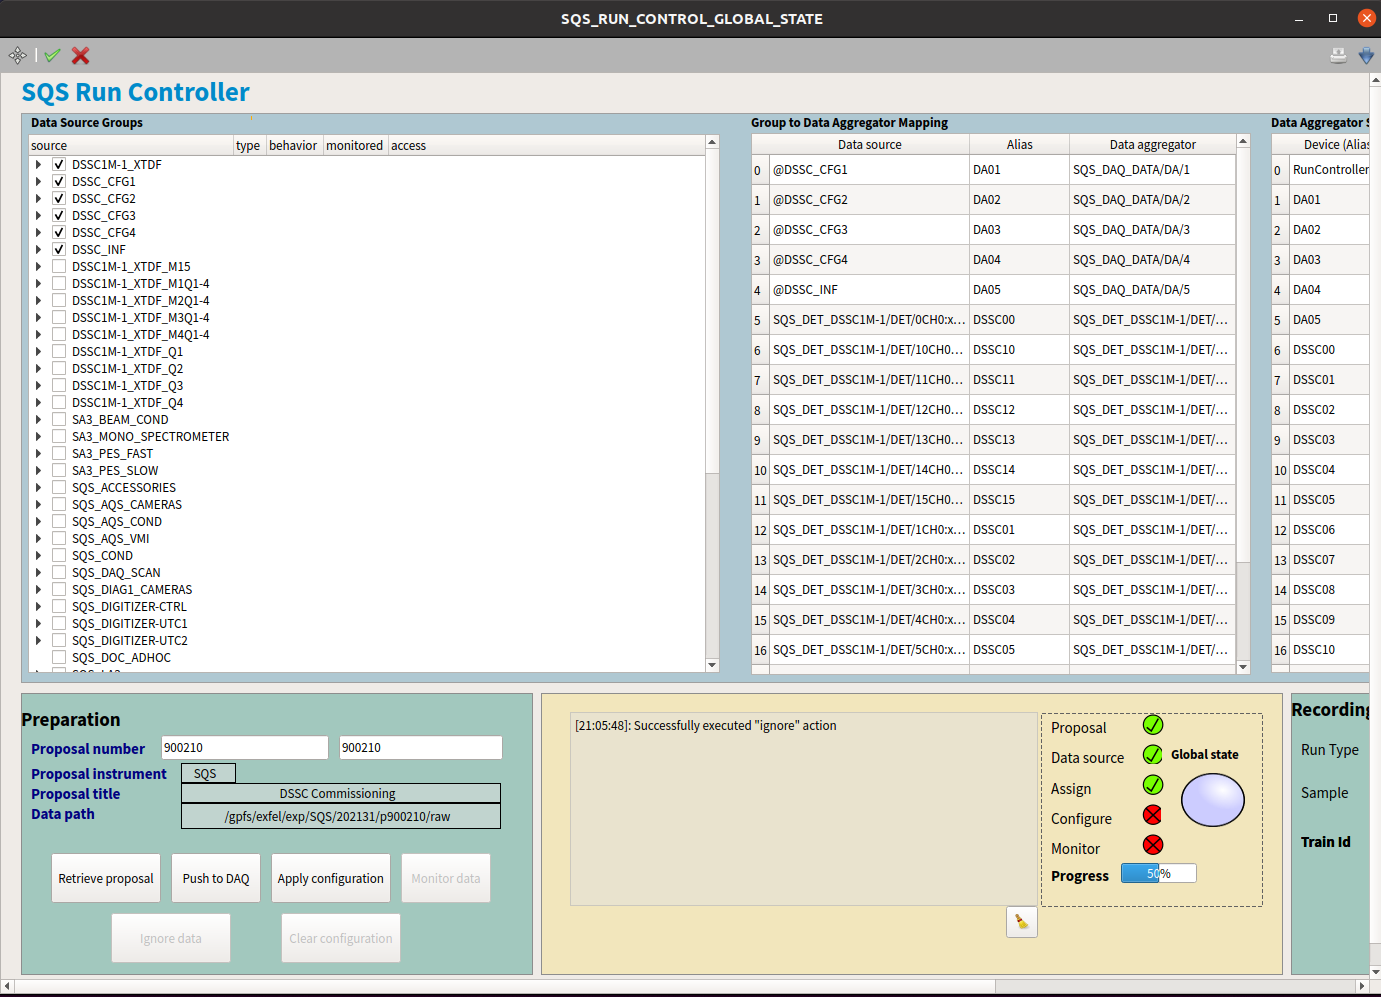
Fig. 5.1 Run controller scene SQS example, the similar scene has SCS instrument.
The online preview works only if ‘Monitor Data’ is active and the proper data sources are included.
- To start an acquisition (writing to disk), one can proceed in two different ways:
- Press ‘Start Run’ in the
SCS(SQS)_RUN_CONTROLscene, and then ‘Stop run’ when you want the run to be over. In this method, one cannot record a selected number of frames. - Use the
DSSC_Mainscene. There atPPT/ASICS Configuration Panel(see Fig. 5.2), one can set the number of trains to be sent (number of iterations) as well as the number of pulses per train (frames to be sent). The ‘Preburst Vetos’ parameter shall not be changed by non-experts. - When the parameters are set, press
Run burst acquisitionif you want exactly the set number of trains to be recorded. At the end of the run, press ‘Start data sending’, the detector will start sending data continuously again.
- Press ‘Start Run’ in the
The runs can be migrated to the Maxwell cluster logging into the myMDC system. In a web browser type https://in.xfel.eu/metadata/ and log in with your credentials (see Fig. 5.3). Once the proposal has been selected, you can see the run list, but only managers can migrate runs to Maxwell. If you are not a manager, ask beamline scientists to see if they can make you a manager.
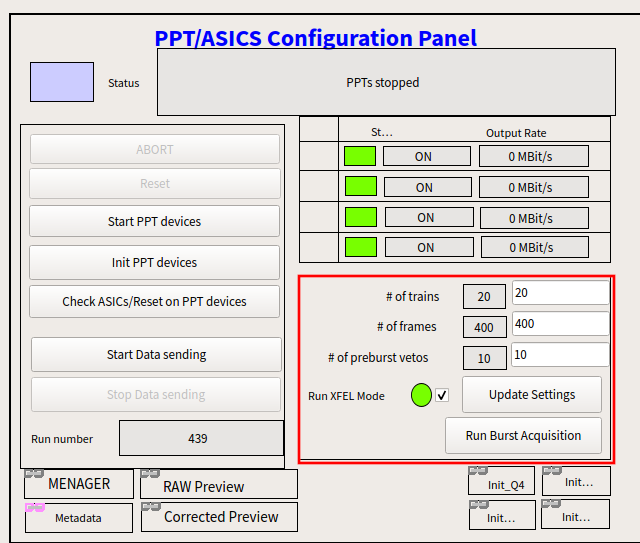
Fig. 5.2 DSSC PPT and ASICs configuration pannel. The panel also is used to configure DSSC # of frame per train.
5.1. Taking dark data runs
At the beginning of the data taking, when the detector is properly configured and the ASICs correctly programmed as much as possible, a dark run has to be taken. Proceed as explained above. 20 trains are sufficient.
When the run is taken, in order to enable pedestal subtraction in the corrected online preview, migrate it to Maxwell and proceed as follows:
- Afte run is migrated click on the “Calibration Constants on under proposal menu on metadata catalog”
- In
Detectorfield selectSCS(SQS)_DSSC1M1-1- mark all
Detector unitsi.e. all 16 modules of DSSC.Operation ModeselectStandard Operation- from
Run numbersdwop down menu select just migrated run mumber
- click on
Request- In the sable bellow
Requestbutton you will see status of run proccessing. Refresh the broser to monitor Status. When status changes toFinished, it meands you are ready to load new constants forCorrrected online preview
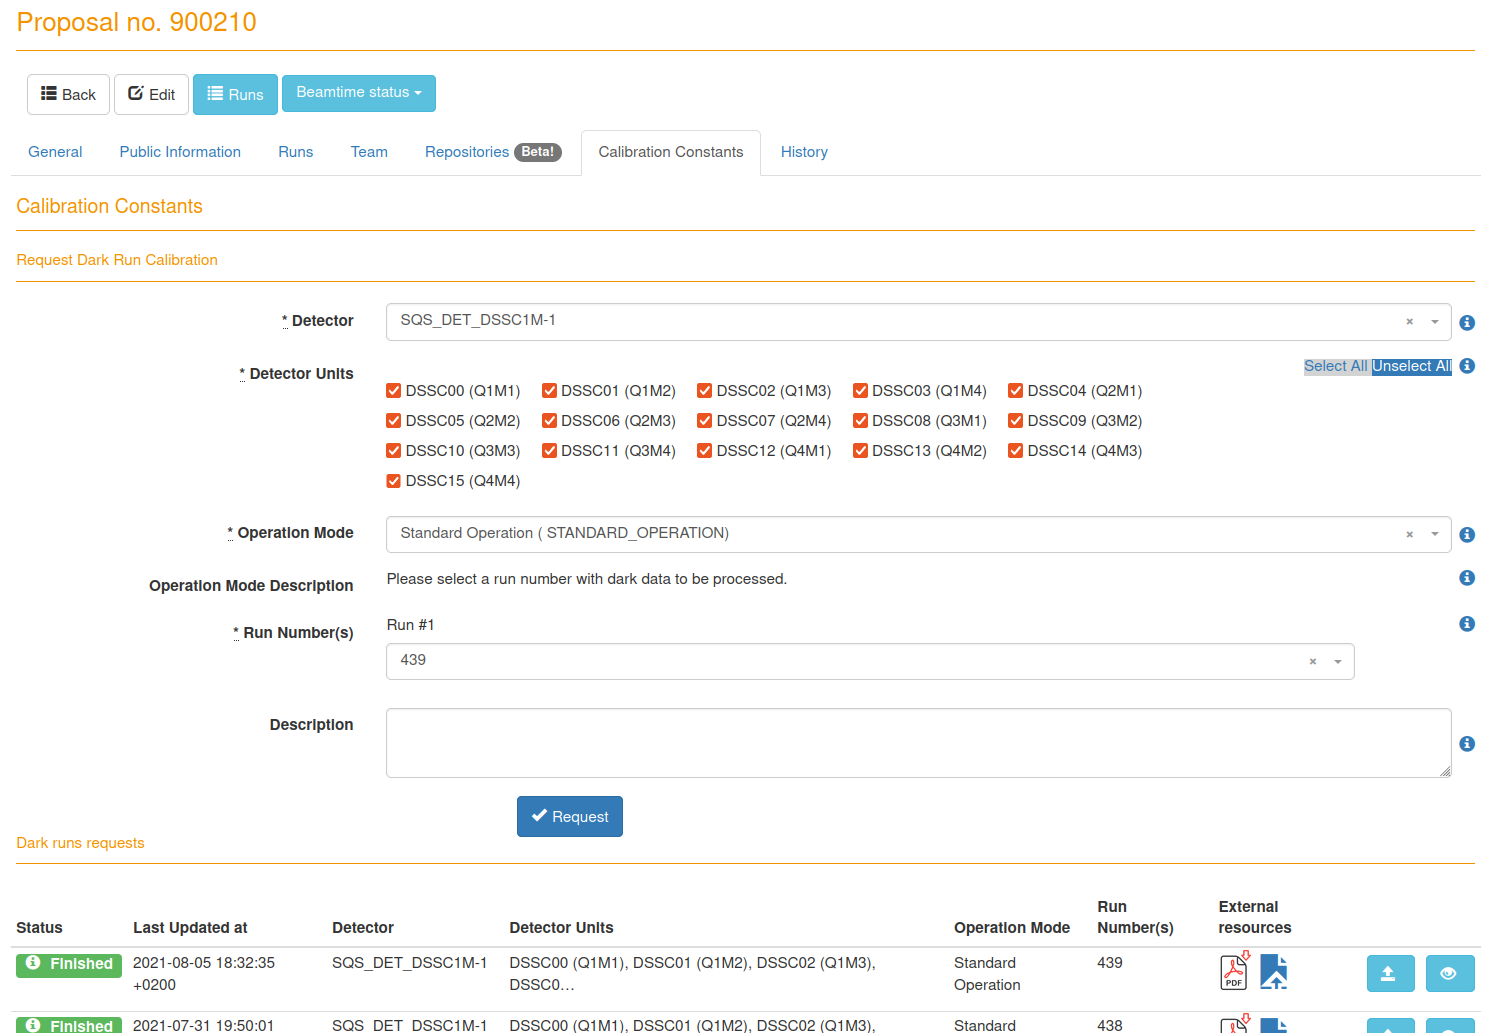
Fig. 5.3 XFEL meta data catalog, recently it has feature to submit dark run and monitor dark run proccessing status.
- This is a old method which is still valid and could be used if you to proccess data manually:
Login to
max-exfl.Type
module load anaconda/3- Run the script which evaluates dark image subtraction
python /gpfs/exfel/data/scratch/xcal/request_darks.py --instrument SCS
--cycle 201931 --proposal 900095 --run xxx [xxx: dark run number]
Wait until the script is finished (it will return
DONEon the script, but this can take on the order of 10 minutes).
- Loading new constants
- Open the
MANAGERscene in theDSSC_ONLINEsub-project. - Click on
Reset. - Click on
Initand wait until all the files are updated (OFFSET columns in theMANAGERscene will change from green to blue). - Click on
Resetagain. - Now offset corrections are applied to the online preview.
- Open the
If the results are not good (most likely due to some ASICs still flickering), repeat the procedure.